Procedure
- Record the date and time as follows:
- Record the stop date and time for the Storage Facility Bring-up phase in Table 3, in section Recording information for the installation report.
- Record the start date and time for the HMC Customization and Communications Test phase in Table 3, in section Recording information for the installation report.
- Are you installing a storage facility containing a secondary
management console (MC2)?
- Yes, continue with the next step.
- No, continue with step 10.
- On the primary management console (MC1), verify
that the LPARs in this storage complex are in an "On Line"
state.
- From the navigation
area, click Storage Facility Management > new storage facility > SF Image #1. Note: Ensure you select the storage facility currently being installed, that is, the one that contains the secondary management console, MC2.
- In the upper Storage Facility Management area, check
the state of the two LPARs for SF Image #1.
Example: SF75FW820ESS01 On Line
Are both LPARs in the "On Line" state?
- Yes, continue to step 4.
- No, make note of the time. Wait 5 minutes, and then retry step
3a.
If, after 30 minutes, the LPARs still do not show "On Line" go to MAP7000 Entry point for storage facility private network problems to check for network problems on the primary management console (MC1). If you are unable to identify and resolve the network problem, contact your next level of support.
- From the navigation
area, click Storage Facility Management > new storage facility > SF Image #1.
- At the rear of the new Rack-1 being
installed, locate the secondary management console (MC2) cables that
were previously disconnected. Reconnect them to the Ethernet switches.
- Locate the black Ethernet cable previously removed from SW1-T1 and reconnect it to SW1-T1. See Figure 1.
- Locate the gray Ethernet cable previously removed from SW2-T1 and reconnect it to SW2-T1.
Figure 1. 8-port Ethernet switch port designations (SW1, SW2-Tx) Model 941, Model 951, and Model 961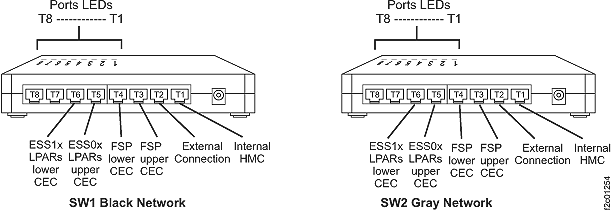
- At the front of the new Rack-1 being
installed, restart the secondary management console (MC2) as follows:
- From the navigation area, click HMC Management.
- In the right work area, go to the Operations section and click Shut Down or Restart. The Shutdown or Restart window opens.
- Select Restart HMC. Click OK.
- Wait for the HMC logon panel to appear and then logon with user ID CE and password serv1cece.
- Allow 10 minutes to pass since the last power on of the secondary HMC.
- Verify that the secondary HMC has access to all the Storage
Facilities in this storage complex.
- In the left navigation area server view, select Storage Facility Management > Storage Facility > Server View.
- Are two 9117 CEC enclosure servers (processor complexes)
listed for each storage facility?
Example: Server-9117-mmm-SNppsssss- Yes, continue with the next step.
- No, verify that all previous steps were completed and that all
cables were connected. Go to MAP7000 Entry point for storage facility private network problems to check for network
problems.
If no problem is found, reboot secondary management console (MC2) and recheck all 9117 servers. If they are still not listed, call your next level of support.
- Do any 9117 servers show a state of No Connection?
- No, continue with the next step.
- Yes go to MAP7000 Entry point for storage facility private network problems to check for network
problems.
If no problem is found, reboot secondary management console (MC2) and recheck all 9117 servers. If they are still not listed or shown as No Connection, call your next level of support.
- Set the HMC remote support options using
the customer work sheets.
- From the navigation area, click Service Management.
- In the right work area, go to the Connectivity section.
- Select the management console navigation item listed in the second column of Table 1.
Note: Additional guidance is available through the on-line Help button and the IBM DS8870 Introduction and Planning Guide.Table 1. Management console customization tasks for remote support Task Management console navigation option Customer Worksheet Done Customer information Manage Customer Information Company information worksheet Outbound Connectivity Settings:
Local ModemManage Outbound Connectivity > Configure > Local Modem tab. Note: To set the Dial prefix, select Allow local modem dialing for service, and then click Modem configuration.Company information worksheet and Outbound (call home) worksheet. Outbound Connectivity Settings:
Internet SSL
See Note 10.a and 10.b below for settingsManage Outbound Connectivity > Configure > Internet tab. Outbound Connectivity Settings:
Internet VPN
See Note 10.c below for new VPN information to support existing customization worksheets.Manage Outbound Connectivity > Configure > Internet VPN tab. If the customer allows a VPN connection, ensure the Allow a VPN and an existing Internet connection for service box is selected.
Outbound (call home) worksheet Outbound Connectivity Settings:
Pass-Through SystemsManage Outbound Connectivity > Configure > Pass-Through Systems tab Note: Do not select Allow pass-through systems for service.Click OK when finished with Outbound Connectivity Settings (Local Modem, Internet, Internet VPN and Pass-Through Systems).
Management console network settings worksheet Call-Home Server Consoles Notes:- The number of Call Home Server Consoles (HMCs) listed in the (IP Address or Host Name field) matches the number of HMCs configured for the storage complex. There is a minimum of one and a maximum of two.
- Local console must be configured before it will be displayed in this list.
- Make sure the check box Use discovered call-home server consoles is selected.
Manage Outbound Connectivity (Call-Home Server Consoles section) Click OK when finished with Call-Home Server Consoles.
Inbound Connectivity Manage Inbound Connectivity Click OK when finished with Manage Inbound Connectivity.
Inbound (remote services) worksheet Notes:- Outbound/inbound connectivity:
- Any combination of outbound connectivity modes is allowed and primarily depends on what the customer's network security policy allows. Although it is beneficial to have multiple outbound paths, enabling only one path is also allowed (preferably broadband such as Internet SSL or Internet VPN). Select the modem as a backup path for SSL or VPN and as a method for unattended remote access.
- Refer to the remote support work sheets, completed by the customer, to verify the remote support settings for outbound (call home) and inbound (remote services) remote support. When you enable outbound (call home) support, the management console sends an electronic call home record to IBM support when there is a problem within the storage complex.
- If inbound remote services are enabled, IBM next level of support can perform service tasks remotely. They can view error logs, problem logs, and initiate trace or dump retrievals. If outbound support is enabled, but inbound remote services is not enabled, the IBM service representative must be on-site to troubleshoot and service the storage complex.
- Secure Sockets Layer (SSL):
- The Internet SSL option allows your MC to connect to the IBM service center with a secure sockets layer Internet connection. The customer must open port 443:tcp in the network infrastructure.
- Although SSL may be configured, the modem can also serve as a backup. If the modem is configured, IBM support can remotely access the MC without having a person on-site to initiate the connection.
- If SSL connectivity is not an option, you can configure FTP for faster offload of log and trace data.
- VPN: (the following is new information and may not
be in the version of the customization worksheet provided by the customer)
- Selecting By VPN means that the customer allows the management console (MC) to use VPN over an Internet connection when a connection is established to the IBM service center. IBM's VPN implementation is a client/server VPN. The two VPN endpoints are on the MC and on the IBM Boulder/Rochester VPN server. There is no need for additional VPN hardware in the customer network infrastructure.
- If you use VPN, the management console (MC) must have access through
your Internet firewall to the following:
- IBM Boulder VPN server, IP address 207.25.252.196
- IBM Rochester VPN server, IP address 129.42.160.16
- IBM Boulder test VPN server no longer used.
- If VPN connectivity is not an option, FTP can be configured for faster offload of log and trace data.
- Even if VPN is configured, the modem can serve as a backup. If configured, it also allows IBM support personnel to remotely access the MC without a person on-site having to initiate a connection.
- General information: The remote support worksheets enable you
to specify whether you want outbound (call home) or inbound (remote
services) remote support. IBM recommends that you enable both outbound
and inbound support to help you maintain the highest availability
of your data.
When you enable outbound (call home) support, your management console sends an electronic call home record to IBM support when there is a problem within the storage complex. In the header of each call-home record, a callback password appears.
If inbound remote services is also enabled, this password enables IBM service representatives to remotely sign on to the management console in response to the service call. If outbound support is enabled, but inbound remote services is not enabled, the IBM service representative must physically come out to your location to troubleshoot and service the storage complex. When inbound remote services are enabled, service representatives can perform service tasks remotely. They can view error logs and problem logs, and initiate trace or dump retrievals.
- Set HMC service agent options using the customer work sheets.
- From the navigation area, click Service Management.
- In the right work area, above the Connectivity section, select the management console navigation item listed in the second column of Table 2.
Notes:- If your Service Agent Configuration Tasks list displays a "Service Agent Connection Manager" option, DO NOT enable it.
- Additional guidance is available through the online Help button and the IBM DS8870 Introduction and Planning Guide.
Table 2. Customization tasks for Service Agent Task Management console navigation option Customer Work Sheet Done Transmit Service Information:
MRPD settingsIf installing a
secondary
management
console, see Note 1Transmit Service Information > Transmit tab
For LIC bundle VRMF 75.0.xx.xx or earlier
- For Service Information transmission, select the Schedule when to transmit the service information check box.
- Set the Frequency to 14 (days).
- Set a Time when the storage facility will already be powered on.
- For Performance management transmission, clear (disable) the Schedule when to transmit the performance management information check box.
For LIC bundle VRMF 75.1.xx.xx or later- Select the Operational test (Heartbeat) interval
to 21 (days). Leave the default time set.Note: This is a server function which is not used by DS8000.
- Select (enable) the Hardware service information (VPD) transmission: check box.
- Set the Interval to 14 (days).
- Set a Time when the storage facility will already be powered on.
- Clear (disable) the Software service information transmission: check box.
- Clear (disable) the Performance management transmission: check box.
Not used. Transmit Service Information:
FTP settingsTransmit Service Information > FTP tab Note: This is only required if the customer has chosen to allow dumps and traces to be sent by FTP.- Select Enable FTP offload of service information check box.
- Leave the default settings for the FTP server.
- If required, enter the customer firewall information.
Click OK when finished with Transmit Service Information (Transmit and FTP).
Outbound (call home) work sheet. Customer Notification:
EmailFrom the Connectivity section, click Manage Serviceable Event Notification > Email tab E-mail notification work sheet. Customer Notification:
SNMPFrom the Connectivity section, click Manage Serviceable Event Notification > SNMP Trap Configuration tab Click OK when finished with Customer Notification (Email and SNMP).
SNMP trap notification work sheet. Note 1:
For LIC bundle VRMF 75.0.xx.xx or earlier: If you have a primary (MC 1) and secondary (MC 2) management console, only set MC 1 to send MRPD data.
For LIC bundle VRMF 75.1.xx.xx or later: If you have a primary (MC 1) and secondary (MC 2) management console, configure BOTH management consoles to send MRPD data. - Set the management console heartbeat
options.
- From the navigation area, click HMC Management.
- In the right work area, go to the Storage Server HMC Tasks section and click View/Change Heartbeat Configuration.
- Select the heartbeat frequency. The recommended setting is 7 days.
- If the heartbeat information must be sent to customer e-mail and SNMP trap destinations, select the Also send heartbeat to customer check box. Note that e-mail destinations must be configured for "All problem events."
- Click Schedule Heartbeat. Do not click Send Heartbeat Now, you will test this later.
- The selected frequency will be displayed. Click Yes to continue.
- Click OK in response to "Successfully scheduled heartbeat".
- The View/Change Heartbeat Configuration window is displayed. Click Close to exit the window.
Note: The management console heartbeat function verifies that the HMC continues to be available for Call Home and Remote service. It uses the VPN connection, or the modem if VPN is not configured. The service representative sets the frequency (1, 7, 14, or 28 days). The recommended setting is 7 days. The heartbeat function creates a serviceable event (SE) on the HMC with SRC BEF00012. The SE contains the frequency setting and is sent to IBM® with the normal SE Call Home function. If IBM does not receive the SEs at the recommended frequency, a service action to determine the cause can be initiated by next level of support. - Continue with the next section.