About this task
Attention: After the RPC cables from
this rack have been connected, DO NOT switch off or remove power to
this expansion rack for any reason.
Procedure
- At the rear of the expansion rack
being installed, find the power control cables that connect to the
upper and lower DC-UPS connectors Ex-J6 and Ex-J7. See Figure 1. The cables
are normally found bundled together at the top of the expansion rack. Figure 1. Location codes for the DC-UPS (Models 961, 96E) (rear)

- Route both expansion rack power
control cables to the Rack-1 RPC cards in the rear upper right.
- Route the expansion rack power control cables
 through the frame to frame access
holes near the rear cover upper hinges and on top of the sheet metal
cable tray. See Figure 2.
through the frame to frame access
holes near the rear cover upper hinges and on top of the sheet metal
cable tray. See Figure 2. - In Rack-1, route the expansion rack power control cables
 on top of the sheet metal tray and to the RPC cards
  . See Figure 3. Do not connect the
cables until directed in the next step. Figure 2. Routing rack-to-rack power control and FCAL cables on top of the sheet metal tray
. See Figure 3. Do not connect the
cables until directed in the next step. Figure 2. Routing rack-to-rack power control and FCAL cables on top of the sheet metal tray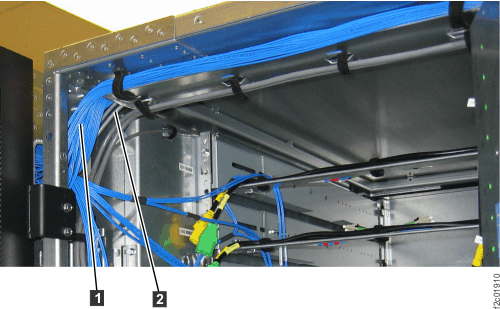 Figure 3. Routing expansion rack power control cables through Rack-1 on top of sheet metal tray to RPC cards
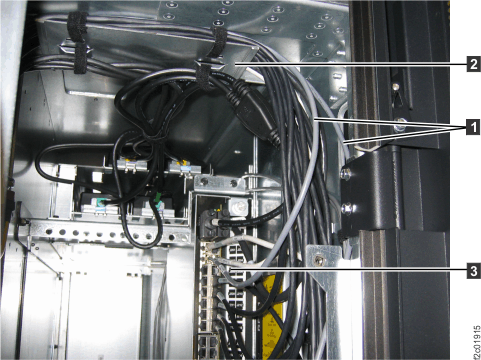
- Route the expansion rack power control cables
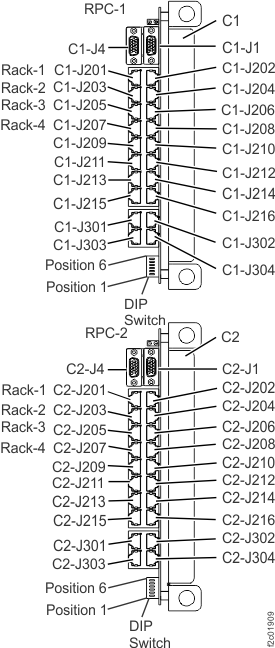
- Use Table 2 and Figure 4 to determine which
RPC-2 card connector to plug the expansion rack power control cable
to. Connect the cable to the RPC card.
Table 1. Rack number and RPC-1 connector locations From DC-UPS connector Ex-J6 in rack number: To Rack-1 RPC-1 card (upper card) 2 C1-J203 3 C1-J205 4 C1-J207 Table 2. Rack number and RPC-2 connector locations From DC-UPS connector Ex-J7 in rack number: To Rack-1 RPC-2 card (lower card) 2 C2-J203 3 C2-J205 4 C2-J207 Figure 4. Location codes for the RPC cards (Model 961)