DS8000 Service Documentation Version 7.5
PCIe and SPCN cable bundle is preinstalled in Rack-2
Procedure
- At the rear of Rack-2 uncoil the PCIe and SPCN cable bundle.
- Route the PCIe and SPCN cable bundle down and out the tailgate.
See Figure 1.
- Route the PCIe and SPCN cable bundle out the left side
of the tailgate as shown.
- Curve the cables in Rack-2 to allow slack in the bundle.
The slack will allow the bundle to be moved left or right for better
access when replacing FRUs.
- Use cable ties to tie the cable bundles to the tie points
 (Figure 2)
on the left side of the tailgate.
(Figure 2)
on the left side of the tailgate.
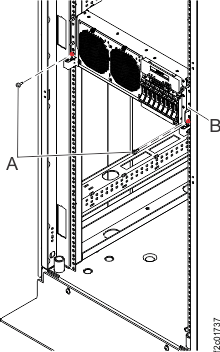
Figure 1. Rack-2 Mechanical routing
of the PCIe and SPCN cables (rack-to-rack)
Figure 2. Tailgate cable bundle tie
points
- Route the PCIe and SPCN cable bundle to Rack-1.
- On a raised floor, the cables are routed down through the
tile cutouts and underneath the floor.
- On a non-raised floor, the cables are routed beneath the racks.
- Route the PCIe and SPCN cable bundle up through the Rack-1
tailgate. Leave the cable ends laying loose.
- Two existing SPCN cables in Rack-1 will be disconnected
at both ends to open each SPCN loop so Rack-2 SPCN cables can be connected
to extend the loops to Rack-2. See Figure 3, Figure 4, and Figure 5.
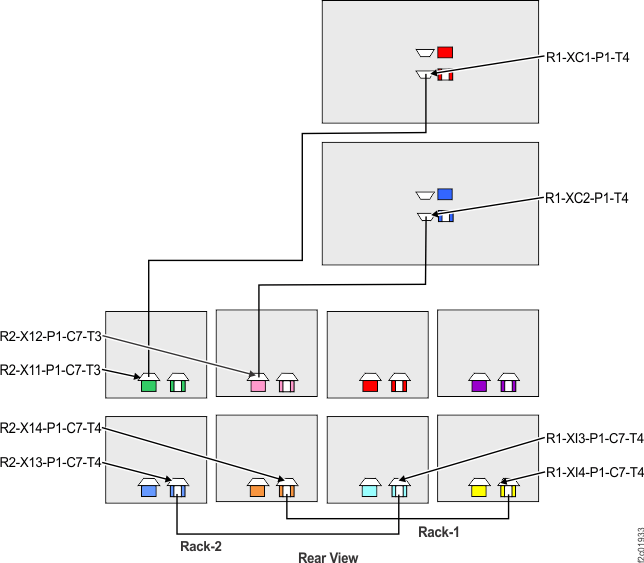
- Disconnect the Rack-1 SPCN cable between R1-XC1-P1-T4
(upper CEC enclosure) and (1B3) R1-XI3-P1-C7-T4 (lower left I/O enclosure).
In addition to the location code label, most of these SPCN cables
are labeled "FROM RACK 1" at both ends.
- Disconnect the Rack-1 SPCN cable between R1-XC2-P1-T4
(lower CEC enclosure) and (1B4) R1-XI4-P1-C7-T4 (lower right I/O
enclosure). In addition to the location code label, most of these
SPCN cables are labeled "FROM RACK 1" at both ends.
- Leave both SPCN cables routed and tied in Rack-1, do
not remove them. These SPCN cables must be reconnected if Rack-2 is
ever permanently removed.
Figure 3. Rack-1, two SPCN cables
to be disconnected at both ends
Figure 4. CEC enclosure locations
on cable labels (rear view)
Figure 5. I/O enclosure locations on cable
labels
- In later steps, you will be directed to reference this
step to route PCIe and SPCN cables through the CEC enclosure cable
management arm.
- Do not loosen or remove the cable ties for the existing
cables in the cable management arm. The cables being added will all
be routed and then tied on top of the existing cables.
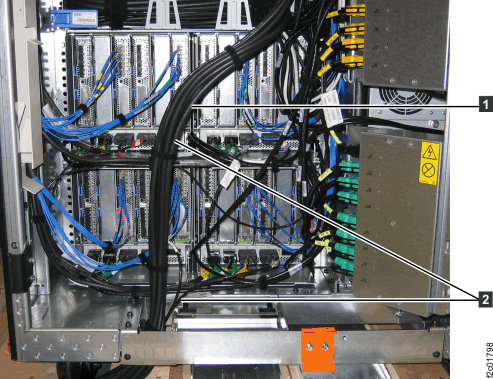
- When routing the cables through the cable management
arm, leave enough extra cable length 1 from
where it exits the cable management arm 2 to
ensure it does not pull on the CEC enclosure connector. See Figure 7.
- Connect the cable to the CEC connector.
- Check the extra cable length with the CEC enclosure
in the normal operating position (cable management arm folded) and
also with the CEC enclosure in the service position (cable management
arm fully extended).
- To put the CEC enclosure in the service position, at
the front of the CEC enclosure, remove the two screws A (10
mm hex head) that secure the CEC enclosure B to
the rack. See Figure 8.
Ensure the cables do not pull tight. Make cable adjustments as needed.
- When all the cables are properly installed in the cable
management arm, use cable ties to secure them. Ensure the cables do
not bulge up at the hinge point in the cable arms.
Notes: Figure 6- 4 PCIe and SPCN cable bundle coming
up through the Rack-1 tailgate.
- 3 PCIe and SPCN cables that enter
cable management arm for the lower CEC enclosure.
- 2 PCIe and SPCN cables that enter
cable management arm for the upper CEC enclosure.
- 1 SPCN and PCIe cables that exit
the cable management arm and connect to the rear of the CEC enclosure.
Figure 6. Routing PCIe and SPCN cables
through the CEC enclosure cable management arm
Figure 7. Extract cable Routing PCIe
and SPCN cables through the CEC enclosure cable management arm
Figure 8. Preparing the CEC enclosure
for service position
- Route and connect the thin SPCN cable to the upper CEC
enclosure (XC1).
- Locate the SPCN cable in the PCIe and SPCN
cable bundle that has a location label with XC1-P1-T4. The SPCN cable
should also be labeled "FROM RACK 2." See Figure 4.
- Reference step 6 for guidance on how to route the cable
through the CEC enclosure cable management arm and then connect it
to the CEC connector. See Figure 9.
Figure 9. Rack-2 to Rack-1 SPCN cables
- Route and connect the thin SPCN cable to the lower CEC
enclosure (XC2).
- Locate the SPCN cable in the PCIe and SPCN
cable bundle that has a location label with XC2-P1-T4. The SPCN cable
should also be labeled "FROM RACK 2." See Figure 4.
- Reference step 6 for guidance on how to route the cable
through the CEC enclosure cable management arm and then connect it
to the CEC connector. See Figure 9.
- Route and connect the two thin SPCN cables to the two lower
I/O enclosures. See Figure 5 and Figure 9.
- Locate the two SPCN cables in the PCIe and SPCN cable
bundle that have the following location code labels:
- R1-XI3-P1-C7-T4
- R1-XI4-P1-C7-T4
Note: In addition to the location code label, most of these
SPCN cables are labeled "FROM RACK 2."
- Connect the cables.
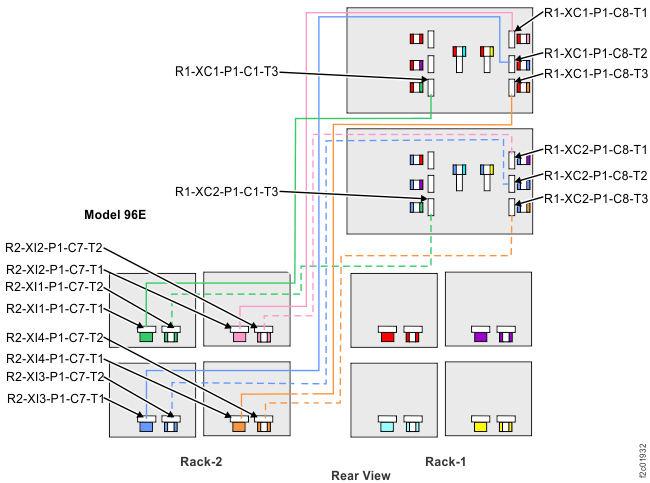
- Route and connect the four black PCIe cables to the upper
CEC enclosure (XC1).
- Locate the PCIe cable in the PCIe and SPCN cable bundle
that has the following location labels. See Figure 4 and Figure 10.
- XC1-P1-C1-T3
- XC1-P1-C8-T3
- XC1-P1-C8-T2
- XC1-P1-C8-T1
- Reference step 6 for guidance on how to route the cables
through the CEC enclosure cable management arm and then connect them
to the CEC connectors.
Figure 10. Rack-2 to Rack-1 PCIe cables
- Route and connect the four black PCIe cables to the lower
CEC enclosure (XC2).
- Locate the PCIe cable in the PCIe and SPCN cable bundle
that has the following location labels. See Figure 4 and Figure 10.
- XC2-P1-C1-T3
- XC2-P1-C8-T3
- XC2-P1-C8-T2
- XC2-P1-C8-T1
- Reference step 6 for guidance on how to route the cables
through the CEC enclosure cable management arm and then connect them
to the CEC connectors.
- Finish the installation of the PCIe and SPCN cable bundle
in the Rack-1 tailgate. See Figure 11.
- Pull the cable bundle up into the rack to allow a curve.
The curve will allow the bundle to be moved left or right for better
access when replacing FRUs.
- Use cable ties to secure the bundle to the tie points (Figure 2)
on the left side of the tailgate.
Figure 11. Rack-1 Mechanical routing
of the PCIe and SPCN cables (rack-to-rack)
- Reinstall the tailgate frame brackets in Rack-1 and Rack-2.
- Go to Completing the logical installation of the I/O enclosures.
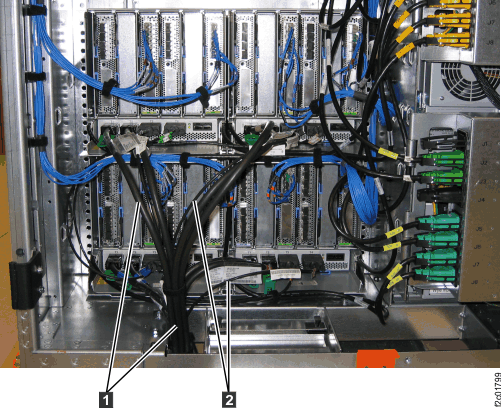 Figure 2. Tailgate cable bundle tie points
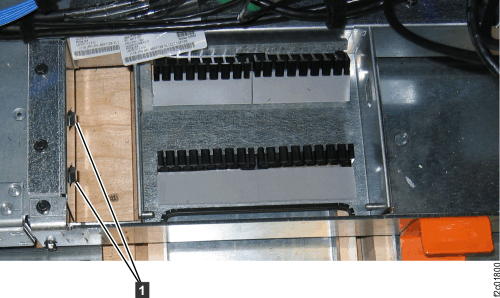
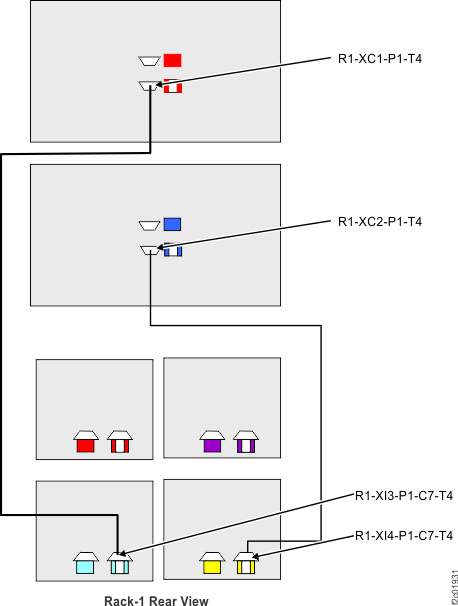 Figure 4. CEC enclosure locations on cable labels (rear view)
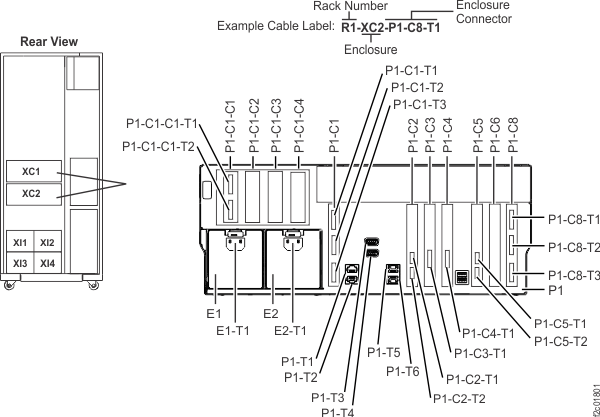 Figure 5. I/O enclosure locations on cable labels
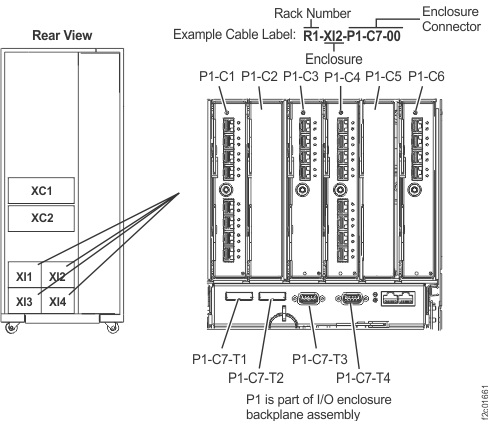
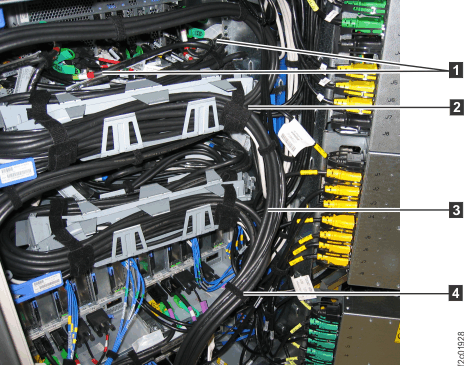 Figure 7. Extract cable Routing PCIe and SPCN cables through the CEC enclosure cable management arm
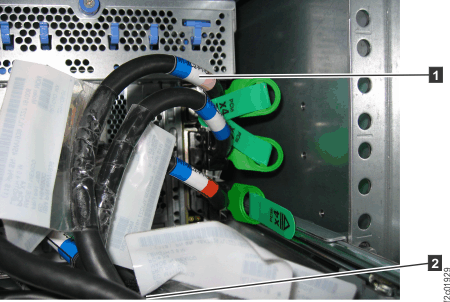 Figure 8. Preparing the CEC enclosure for service position