You are here to install one or more high-performance flash
enclosures in Rack-2.
Procedure
- Begin the installation of the Rack-2 flash enclosures
at the HMC.
- From the navigation area, click .
- From the bottom Task area, click .
- The Install window opens
and asks if you were sent from the installation or MES instructions.
Click Yes.
- The Single Choice Message Box window
opens and prompts "Select the component or enclosure you would like
to install." Select Install Storage Enclosures and
then click Submit.
- Another Single Choice Message Box window
asks whether you want to install FC-AL storage enclosures or high-performance
flash enclosures. Select Install High-Performance Flash
Enclosures and then click Submit.
- Another Single Choice Message Box window opens and prompts "Select
the Storage Facility Image you want to assign the storage enclosures
to." Select the storage facility image that is shown and click Submit.
- High-performance flash enclosures are installed one at
a time, in the order that is shown in Table 1.
Table 1. Flash
enclosure installation order| Installation order |
Flash enclosure location |
DA pair ID |
PCIe storage interface card locations |
|---|
| 1 |
R2-B04 |
14 |
(2B3) R2-XI3-P1-C2
(2B4) R2-XI4-P1-C5 |
| 2 |
R2-B03 |
12 |
(2B1) R2-XI1-P1-C2
(2B2) R2-XI2-P1-C5 |
| 3 |
R2-B02 |
15 |
(2B3) R2-XI3-P1-C5
(2B4) R2-XI4-P1-C2 |
| 4 |
R2-B01 |
13 |
(2B1) R2-XI1-P1-C5
(2B2) R2-XI2-P1-C2 |
- The Select PCIe Interface Card Pair window
prompts you to select the interface card pair to install the flash
enclosure to. Select the DA pair ID for the enclosure to be installed,
and click OK.
- The Select Storage Enclosure window
prompts you to select the flash enclosure(s) to install. Select the
enclosure location and click OK.
- The Action Panel displays the DA
pair and location of the flash enclosure(s) to install. Confirm that
the location is correct and click OK to install.
- A warning panel is displayed. Read the panel and click Next to
continue.
- The InsMesInstructions window directs
you to return to the MES or installation instructions to install the
storage enclosure. Do NOT click Next at
this time. Continue to the next step.
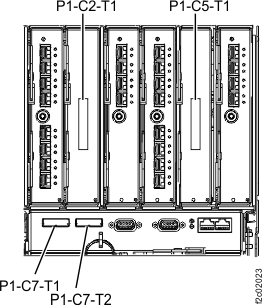
- Refer to Table 1 to
confirm the two PCIe storage interface card locations for the flash
enclosure you are installing. Connect the PCIe cables to these two
cards ONLY. Ensure the PCIe connectors are firmly seated into the
cards. See Figure 1 and Figure 2.
Figure 1. PCIe cable connections
(standard configuration, Rack-2, rear) (Models 961/96E)
Figure 2. I/O enclosure PCIe cable
locations (rear)
- After the two PCIe cables are connected, click Next on
the InsMesInstructions window.
- The HMC logically installs and verifies the flash enclosure.
The HMC displays some or all of the following messages:
Task in Progress... Powering on the FRU(s)
Task in Progress... Verifying the FRU power on
Verification progress... Verification progress:
Working
Task in Progress... Activating the system (could take 20 minutes or more)
Working
Task in Progress... Verifying system
Verification progress... Verification progress:
Working
Task in Progress...Activating application(s)
Verification progress... Verifying application(s)
Verification progress... Verification progress:
Working
- The HMC display indicates that the installation has completed
successfully and directs you to return to the MES or installation
instructions. Click Next.
- The HMC displays some or all of the following messages:
Service action ending...
Working
The HMC service panel then closes. Continue to the next step.
- Have all the high-performance flash enclosures in Rack-2
been installed?
- Yes, to go the next step.
- No, return to step 1 to
install the remaining flash enclosures.
- Display and repair any related open serviceable events.
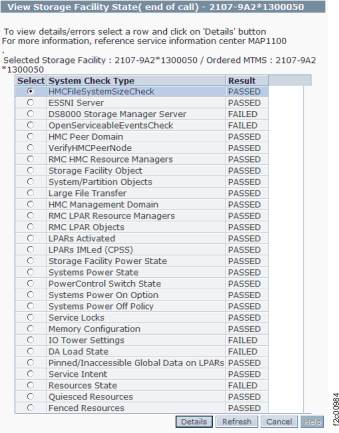
- View the storage facility
state, refer to MAP1100 View storage facility state (end of call).
- From the navigation area, click .
- From the bottom Task area, click . A window displays the status (passed/failed)
of 25 or more system checks. Figure 3 is
an example.
- All status fields should display as PASSED
except for the following.
- If the Resources State result is "Failed",
select it and then click Details. If the Drive state
is "5 (Certifying)",
this is normal and you should go to the next step.
- If other checks are failed, select it and then click Details.
They should be fixed before going to the next step. If needed, call
the next level of support.
Note: If the Large File Transfer (the tenth System Check Type status from the
top) displays as FAILED, the remaining System Check Types below
it cannot be displayed. Contact the next level of support.
Figure 3. Window: View Storage Facility
State
- Are you also installing Rack-3 on this
storage facility as part of this installation activity?
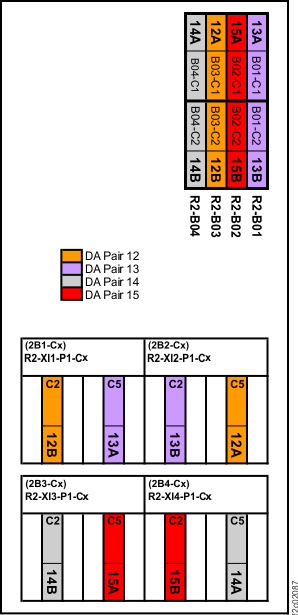 Figure 2. I/O enclosure PCIe cable locations (rear)