DS8000 Service Documentation Version 7.5
Positioning the expansion rack
Procedure
- Determine the position of each expansion rack
to be installed to this storage facility.
- When viewed from the front of Rack-1, each expansion
rack is installed to the right. See Figure 1.
- Use each expansion rack number label 2 (Figure 1) to determine its
position.
- Roll the expansion racks being installed into position.
Keep them about 20 cm (8 inches) apart from each other
Figure 1. Rack serial number and
rack number labels (Models 961, 96E) (Rack-4 not shown)
- On the rear of each expansion rack being installed,
remove the right cover.
- On the upper and lower door hinges, loosen the screw 1 and
move the retention plate 2 that prevents
the hinge pin 3 from being removed. Refer
to Figure 2.
- Remove the hinge pins, remove the rear cover and place
it in a safe location.
Figure 2. Removing rear right cover
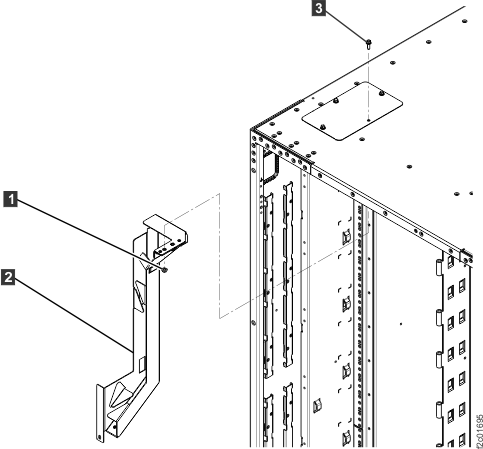
- Bolt the expansion rack to the
existing rack.
- Roll the expansion rack into position, approximately
3" (75mm) from the existing rack.
- In the expansion rack ship group, locate:
- 4 x spacer studs P/N 22R5046
- 7 x spacer mounting bolts P/N 1621545
- 4 x M8 washers P/N 84X5850
- See Figure 3.
The front of the rack uses two spacer studs, four bolts and four washers.
- See Figure 3.
The rear of the rack uses two spacer studs, three bolts and no washers.
- In the rear upper left corner of the existing rack,
next to the hinge, there are two holes; one above the other. See Figure 4. In the lower hole,
install a spacer stud with a mounting bolt. Leave the bolt loose
so the spacer studs can move to line up with the rack being installed.
- Install the remaining three spacer studs to the existing
rack. Leave the bolts loose so the spacer studs can move to line up
with the rack being installed.
- Move the expansion rack into its final position and
install the bolts and washers as shown in Figure 3.
- To access the front lower left bolt, you must temporarily
remove the battery service module enclosure cover (if present).
- At the bottom of the cover, pull the knob out on both fasteners.
- Pull the bottom of the cover away from the BSM set.
- Lift the cover up until the two top sheetmetal tabs release from
the BSM set enclosure.
- When the alignment is correct, tighten all the bolts
that have been installed.
- Install the BSM set enclosure cover (if removed).
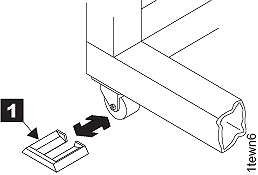
- Install the wheel chocks 1 (located
in the ship group) on all four casters. See Figure 5.
Figure 3. Rack positions and connection
hardware
Figure 4. Interrack spacer studs
Figure 5. Wheel (wedge) chocks
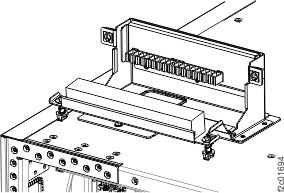
- If you are installing Rack-2, does it have an
upper "funnel" bracket 2 inside
at the rear top left of the rack, see Figure 6.
- Yes, go to the next step.
- No, go to step 8.
Figure 6. Removing top tailgate cover
plate
- Looking down at the top left rear of the rack,
inspect the top tailgate cover plate screw 3 .
See Figure 6.
- If the screw is installed from the top (only screw head is
visible), go to the next step.
- If the screw is installed from inside the rack, (only threaded
end is visible) to go step 7.
- The screw is installed from the top of the rack.
Install the screw from inside the rack and then install the top tailgate.
- Remove and discard the nut 1 securing
the upper "funnel" bracket 2 of
the host cable channel. See Figure 6.
- Remove the long screw 3 from
the top of the rack.
- Install the long screw 3 from
inside the rack. The threaded end of the screw will extend out the
top of the rack.
- At the top of the rack, remove the three screws that
secure the cover plate to the top of the rack. Remove the cover plate.
- Store the cover plate in the document enclosure at the
front top left of the rack.
- Position the tailgate assembly over the opening at the
top of the rack. See Figure 7.
Secure the assembly with the three screws that were removed in step
d.
- Go to step 8.
- The
screw is installed from inside the rack. Install the top tailgate.
- Looking down at the top of the rack, remove the three
screws around the opening for the funnel bracket. See Figure 6. The cover plate
already removed and stored in the document enclosure at the front
top left of the rack.
- Position the tailgate assembly over the opening at the
top of the rack. See Figure 7.
Secure with the three screws that were just removed in substep a.
- Go to the next step.
- Go to the next section.
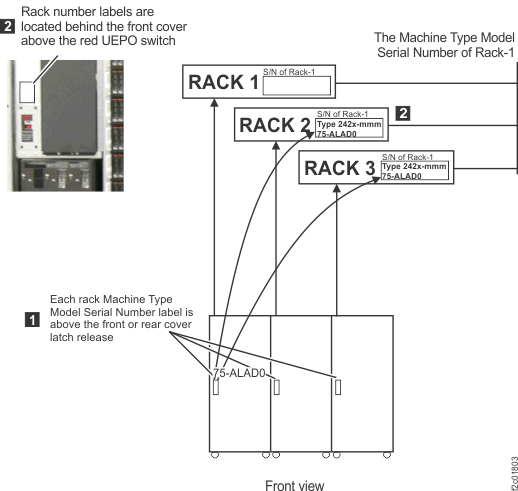
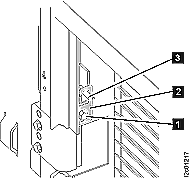
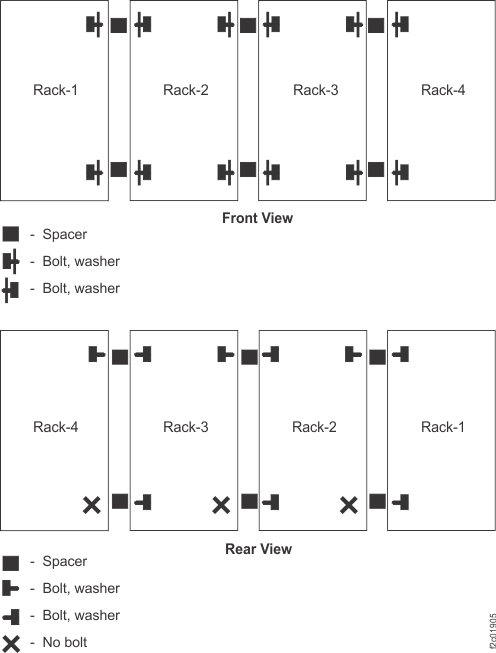 Figure 4. Interrack spacer studs
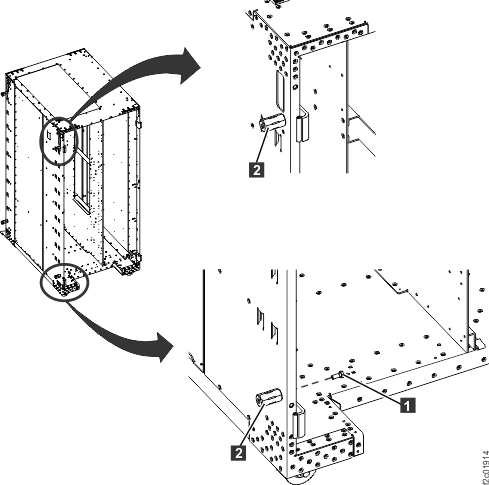 Figure 5. Wheel (wedge) chocks