Procedure
- Verify the setting of the following switches on Rack-1.
Table 1. Switch settings and locations Switch Setting Location Figure reference Battery enclosure circuit breakers CB0 and CB1. On (up) On each battery assembly (rear of rack) 4 in Figure 1 UEPO red switch Off (in at bottom) Rack operator panel (front of rack) Note: Press the recessed switch towards the bottom. It will appear flat when off.2 in Figure 2 RPC card DIP switches 1, 2, 4, 5, 6 (Both cards)
Off (right) Both RPC cards (top rear of rack) 1 in Figure 1 RPC card DIP switch 3 (Both cards)
Off (right) zSeries power feature is not installed (LR card) Note: The ZLR card shown in 2 in Figure 1 differs from the LR card in that it has four large connectors at the top.1 in Figure 1 On (left)
zSeries power feature is installed (ZLR card) 1 in Figure 1 Local Remote switch Local (left) LR or ZLR card (rear of rack) 2 in Figure 1 Figure 1 shows the rear view of the rack:Figure 1. Rack rear view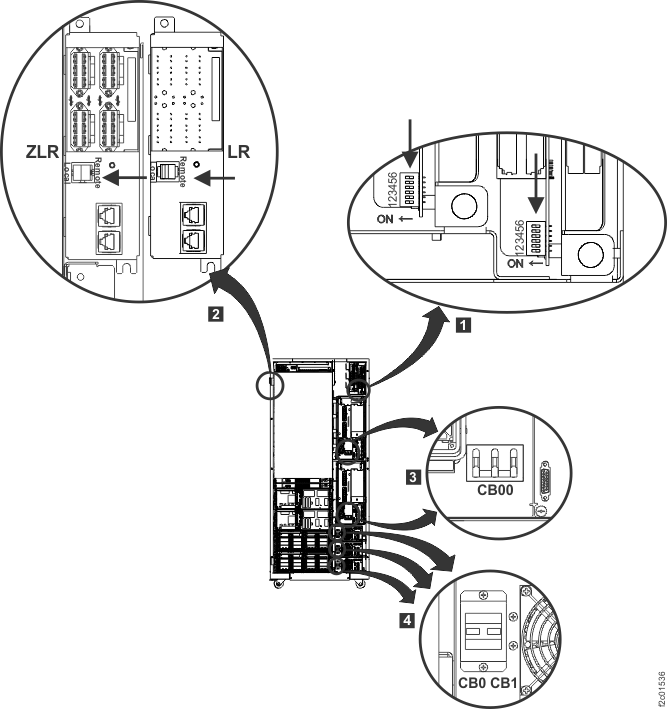 Figure 2 shows rack UEPO locations.Figure 2. UEPO switch
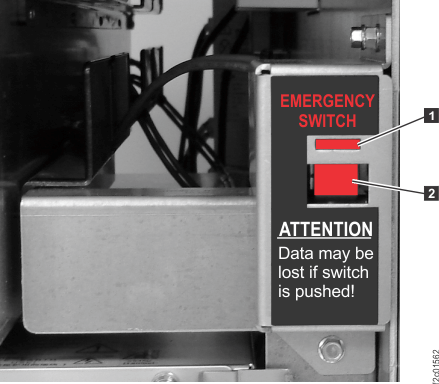
- Continue verifying the settings of the following
switches on Rack-1.
Table 2. Switch settings and locations Switch Setting Location Figure reference Primary power supply circuit breaker CB00 Off (down) On each PPS, on the AC input power module (rear of rack) 3 in Figure 1 Primary power supply sequencer module enable/disable switches Enabled (up) Three switches on each sequencer module (rear of rack) 1 in Figure 3 PPS 208V DDM power module enable/disable switches Enabled (up) One switch on each 208V DDM power module (rear of rack) 1 in Figure 4 Enable/disable switch on the PPS booster power module (Power Line Disturbance PLD module) Enabled (up) Optional module, only present for PLD feature. One on each PPS on booster power module (rear of rack)  in Figure 5.Figure 3 shows the enable disable switches for the primary power supply sequencer module.Figure 3. Model 951 PPS sequencer module and LED enable/disable switch
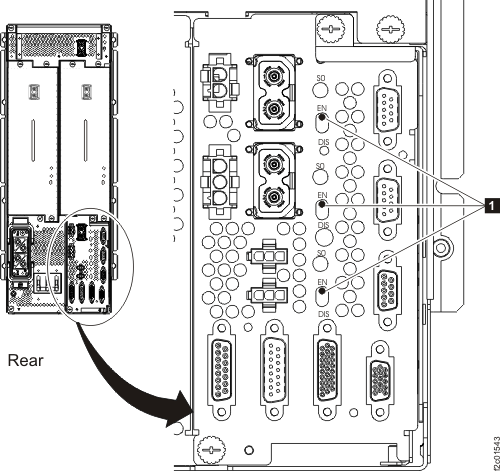 Figure 4 shows the enable disable switches for the primary power supply DDM.Figure 4. Enable/disable switch on a 208V DDM power module (PPS)
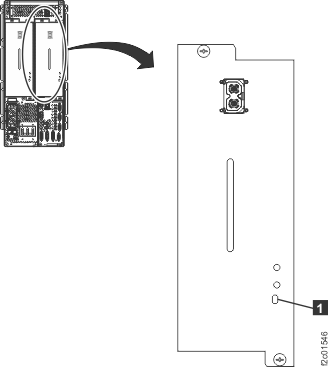 Figure 5 shows the enable disable switch on the Power Line Disturbance module.Figure 5. Enable/disable switch on booster power module
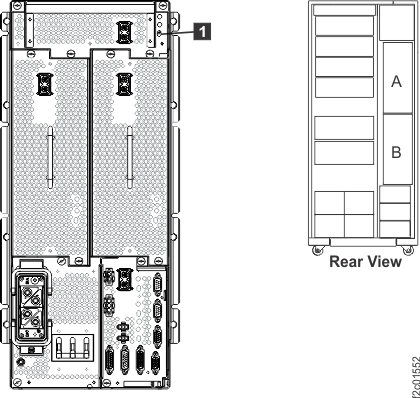
- Verify the setting of the following switches
on each expansion rack. Each rack has:
- One UEPO switch
- Two PPSs
- Zero to three battery enclosures
Table 3. Switch settings and locations for storage expansion racks Switch Setting Location Figure reference UEPO red switch Off (down) Rack operator panel (front of rack) Note: Press the recessed switch towards the bottom. It will appear flat when off.Figure 2 Primary power supply CB00 Off (down) On AC input power module 3 in Figure 1 Battery enclosure circuit breakers CB0 and CB1. On (up) On each battery enclosure (rear of rack) 4 in Figure 1 Primary power supply sequencer module enable/disable switches Enabled (up) Three switches on each sequencer module (rear of rack) 1 in Figure 3 Primary power supply DDM module enable/disable switches Enabled (up) One switch on each 208V DDM power module 1 in Figure 4 Enable/disable switch on the PPS booster power module (Power Line Disturbance PLD module) Enabled (up) Optional module, only present for PLD feature. One on each PPS on booster power module (rear of rack) in Figure 5.