DS8000 Service Documentation Version 7.5
Installing and testing the Rack-2 I/O enclosure device adapter
card pairs
Procedure
- Do not plug the FCAL cables into the connectors on the
device adapter (DA) cards during this installation; they will
be connected during the installation of the storage enclosures.
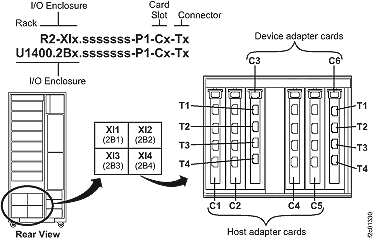
- The Rack-2 device adapter cards are already present and
physically installed in the Rack-2 I/O enclosures. They are either
in I/O enclosure slot 3 or slot 6. See Figure 1
Note: Rack-2
will always have four I/O enclosures. The number of device adapter
card pairs already physically installed in the Rack-2 I/O enclosures
will depend on the number of storage enclosures in Rack-2.
Figure 1. I/O enclosure locations and
device adapter card slot locations
- From the left navigation pane, click on Storage
Facility Management.
- Select Machine Type/Machine Serial.
- From the lower task area, select MES Install/Remove.
- Select Install IO Enclosures or Components.
- When the "Were you sent here from the MES or installation
instructions" screen is displayed, click Yes.
- Click the radio button for Install device adapter,
and then click Submit.
- In the Single Choice Message Box,
the storage facility image is already selected; click Submit.
- In the Action Panel, select only
the Rack-2 I/O drawer (I/O enclosures) that have device adapter cards
already physically installed.
Note: If the I/O drawer does
not have one or two device adapter cards already physically installed,
do not select it.
- Click Submit.
- In the Action Panel, select all
the Rack-2 I/O enclosure slots where the device adapters are physically
present. Use the CTRL key to multi-select.
- Click Submit.
- When the PBESDWarning 10 screen is
displayed:
- Disregard the instructions on this screen. This screen
is common to the device adapter card MES procedure where the device
adapter cards are not already physically installed.
- Click Next.
- The Deactivating applications screen
is displayed.
- The InsMesInstructions screen (that indicates to return
to the MES or Installation instructions) will display for each device
adapter card being installed. Click Next.
- This step can take up to one hour. Each DA
card takes 6 to 7 minutes. Do not assume this process is hung. Allow
the installation process to continue.
- Many screens will subsequently display for the process
of powering on the FRUs, verification, activating applications, and
error logging.
- When the ServiceActionCompleteForInstallPanelBean window
indicates the installation is complete and prompts you to return to
the MES or installation instruction, click Next and
go to the next step.
- If the installation completed successfully go to step 18; if not, go
to the next step.
- If the device adapter install process does
not complete successfully, use the following steps to determine whether
or not the DA card is installed and recognized. Check the Exchange
Parts menu to see if the DA card that you installed is listed
on the IO Enclosure FRUs menu.
- Cards that are logically installed can be repaired using
the standard guided repair procedures.
- Cards that are not logically installed cannot be repaired
using the normal service procedures. Contact your next level of support
to determine how to proceed.
- If the device adapter is mis-plugged into an
HA slot, an SRC will be posted: BE1E255A - An adapter discovery
failed because an incorrect adapter card was plugged into the slot. Contact your next level
of support.
- If the device adapter is not installed in the target
slot, then an SRC will be posted: BE370000 - PCI slot is powered
off. Contact your next level
of support.
- After you correct the problem, go to the next step.
- Display and repair open serviceable events.
- View the storage facility status. If any of the system
check results display as FAILED, view the details and refer to MAP1100 View storage facility state (end of call).
Before you continue
the installation, all fields should display as PASSED.
- Go to Installing and testing the storage enclosures.