Determine if new and existing racks have compatible features.
Procedure
- Determine the model of Rack-1
and the expansion rack being installed. The model number is on the
machine type and model serial number (MTMS) label. Depending on the
model, the MTMS label is located either beneath or to the left of
the UEPO red switch that is on the rack operator panel, or above the
rear door latch.
Figure 1. Rack serial number and rack number labels
- Is Rack-1 a 242x-941?
- Yes, go to the next step.
- No, stop the installation. Rack-1 is not a Model 941 and
these expansion rack procedures cannot be used. Refer to the expansion
rack installation procedures for your model, or contact your next
level of support.
- In the expansion rack you
are installing, observe the Rack number label. See Figure 1.
Note: The Rack number label defines the rack position for this
rack in the storage facility. The intra-rack cables and cable destination
labels for each rack position are unique. The expansion rack must
be installed in the correct position.
- For Rack-2, go to the next step.
- For Rack-3, Rack-4, or Rack-5 go to step 8.
- At the rear of Rack-1 observe
the P1-C9 slot in both CEC enclosures. Is there a four port PCIe card
present in both CEC enclosures?
- Yes, go to the next step.
- No, stop the installation. Contact your next level of support.
Rack-1 does not have the feature installed to support expansion racks.
Figure 2. CEC enclosure, P1-C9 slot
- At the front of Rack-1 observe
the P2-C2 slot in both CEC enclosures.
Do both CEC enclosures
have a processor card installed in the P2-C2 slot? - Yes, go to the next step.
- No, stop the installation. Call the next level of support.
Rack-1 does not have the feature installed to support expansion racks.
Figure 3. CEC enclosure, P2-C2 slot
- Is Rack-2 a 242x-94E?
- Yes, go to the next step.
- No, stop the installation. Expansion rack models 92E, 93E,
9AE, 9BE cannot be used as Rack-2 for 242x-941. Contact your next level
of support.
- Does Rack-2 have four I/O enclosures
at the bottom of the rack?
- Yes, go to step 9.
- No, stop the installation. A Rack-2 that attaches to a 242x-941 Rack-1
must have four I/O enclosures. Contact your next level
of support.
- Is Rack-3, Rack-4,
Rack-5 a 242x-94E?
- Yes, go to the next step.
- No, stop the installation. Call the next level of support.
Note: With an approved RPQ, 242x-92E and 2107-92E are supported
for attachment to a 242x-941 as Rack-3, Rack-4, Rack-5. To ensure
compatibility, an approved RPQ is mandatory. If in doubt, contact
your next level of support.
- Determine if Rack-1 has the extended power
line disturbance (PLD) feature 1055 installed.
- At the rear of Rack-1, observe the top rear of a primary power
supply (PPS). Refer to Figure 4, location Ex-E2.
If the feature is not installed, there is a sheet metal blockout
plate as shown. If the feature is installed, there will be a module
installed with cables going to the 208VDC bus bars to the right of
the PPS.
Note: All
racks in this storage facility must either have the PLD feature installed
or not installed. There cannot be an intermix of racks with and without
the PLD feature.
Figure 4. Location codes
for the PPS (rear)
- Find the row in Table 1 that describes
the PLD configuration for Rack-1 and the expansion rack you are installing.
Take the action listed for that row.
Table 1. Confirm PLD features match between base
and expansion racks| Extended PLD feature 1055 present in Rack-1?
(See Figure 4) |
Extended PLD feature 1055 present in the expansion
rack you are installing? (See Figure 4) |
Action |
|---|
| Yes |
Yes |
Go to the next step. |
| No |
No |
Go to step 12. |
| No |
Yes |
Stop the installation and contact your next
level of support. All racks in this storage facility must either have
the PLD feature installed or not installed. There cannot be an intermix
of racks with and without the PLD feature. |
| Yes |
No |
Stop the installation and contact your next
level of support. All racks in this storage facility must either have
the PLD feature installed or not installed. There cannot be an intermix
of racks with and without the PLD feature. |
- The PLD feature is present.
Ensure the power booster module (Ex-E2 see Figure 4) cable is connected
at both ends (to the booster power module and to the bus bar). Do
this for both PPSs on all racks, and then go to the next step.
- Find the
row in Table 2 that
describes the PLD and battery configuration for the expansion rack
you are installing. Take the action listed for that row.
Table 2. Confirm correct battery configuration| Expansion rack you are installing |
Extended PLD feature 1055 present? |
Number of battery enclosures in the expansion
rack you are installing (See Figure 5) |
Action |
|---|
| Rack-2 |
Yes or No |
2 or 3 |
Go to the next step. |
| 0 or 1 |
Stop the installation and contact your next
level of support. Rack 2 has I/O enclosures and requires the battery
assembly feature. |
| |
|
|
|
| Rack-3, 4, or 5 |
Yes |
2 or 3 |
Go to the next step. |
| 0 or 1 |
Stop the installation and contact your next
level of support. The PLD feature requires two battery module enclosures
minimum. |
| No |
0 |
Go to the next step. |
| 1, 2, 3 |
Stop the installation and contact your next
level of support. Battery module enclosures must not be present when
the PLD feature is not installed. |
Figure 5. Battery module locations
- All racks in this storage
facility must have either three-phase mainline power feature or single-phase
mainline power feature. The HMC GUI installation process will detect
and not allow an intermix.
Notes: - The same primary power supply (PPS) is used for three-phase and single-phase.
The only difference is if the mainline power cord has three wires
or four wires.
- The customer end of a three-phase mainline power cord has
either four bare wires or a connector with four pins.
- The customer end of a single-phase mainline power cord
has either three bare wires or a connector with three pins.
- You should be able to observe the customer circuit breaker for
the mainline power cord to determine if it is single-phase or three-phase.
Do the new and existing racks in this storage facility
have the same phase mainline power feature installed?
- Yes, continue at the next step.
- No, stop the installation and contact your next level of support.
- Observe the storage enclosures
at the front of the expansion rack (Rx-S11 through Rx-S18). See Figure 6.
How many
storage enclosures have DDMs present? - If there are five, six, seven, or eight storage enclosures
that have DDMs present, go to the next step.
- If there are one, two, three, or four storage enclosures that
have DDMs present, go to step 16.
Figure 6. Storage enclosures in expansion
rack with or without I/O enclosures
- Both PPSs (upper and lower)
in the expansion rack being installed must have the second 5/12 V
DDM Power Module in the Ex-E3 position. See Figure 4.
Is
the Ex-E3 module present in both PPSs? - Yes, go to the next step.
- No, stop the installation and contact your next
level of support. An
MES to add the Ex-E3 power modules is required before you can continue
with the installation of the expansion rack.
- Find the expansion rack you
are installing in the following list:
Note: A complete diagram of device adapter pair IDs for storage
enclosures has been included at the end of this section. See
Figure 9.
- Rack-2 go to step 17.
- Rack-3, go to step 18.
- Rack-4, go to step 19.
- Rack-5, go to step 20.
- Observe
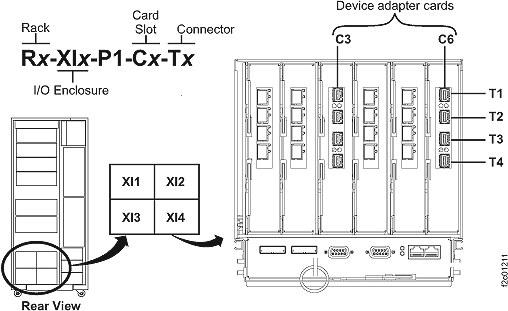
the rear of Rack-2. Use Table 3 to determine
if the Rack-2 has enough DA cards installed.
Table 3. Determining if Rack-2 contains the necessary
DA card pairs to support Rack-2 storage enclosures| If the rear of Rack-2 has a storage enclosure
with DDMs in location: (See Figure 7) |
The rear of Rack-2 must have a DA card pair
in I/O enclosure locations: (See Figure 8) |
|---|
| R2-S21 (XS21) |
R2-XI3 Slot C3
R2-XI4 Slot C6
(DA pair 6)
|
| R2-S23 (XS23) |
R2-XI1 Slot C3
R2-XI2 Slot C6
(DA pair 4)
|
| R2-S25 (XS25) |
R2-XI3 Slot C6
R2-XI4 Slot C3
(DA pair 7)
|
| R2-S27 (XS27) |
R2-XI1 Slot C6
R2-XI2 Slot C3
(DA pair 5)
|
Does Rack-2 have the necessary DA cards?
- Yes, continue with Inspecting for shipping damage.
- No, stop the installation. To install the existing storage enclosures
in Rack-2, you must first install the MESs to add the necessary DA
cards. It is possible to continue the installation without installing
the MESs, but you will not be able to install the affected Rack-2
storage enclosures. Work with your customer and next level of support
to decide how to proceed. If the decision is to proceed, continue
with Inspecting for shipping damage.
Figure 7. Rack-1 and Rack-2 rear view
Figure 8. Locations for device
adapter cards
- You are installing Rack-3. Observe
the rear of Rack-3 and Rack-1. Use Table 4 to determine
if Rack-1 has the specific storage enclosures and DA cards necessary
to connect the cables for the Rack-3 storage enclosures.
Table 4. Determining if Rack-3 storage
enclosures can be cabled to Rack-1 storage enclosures and DA cardsIf the rear of Rack-3 has a storage enclosure
with DDMs in location:
(see Figure 6 ) |
The rear of Rack-1 must have a DA card pair
in I/O enclosure locations:
(see Figure 8) |
The rear of Rack-1 must have a storage enclosure
with DDMs in location:
(see Figure 7) |
|---|
| R3-S21 (XS21) |
R1-XI3 Slot C6
R1-XI4 Slot C3
(DA pair 3)
|
Not applicable |
| R3-S23 (XS23) |
R1-XI1 Slot C6
R1-XI2 Slot C3
(DA pair 1)
|
Not applicable |
| R3-S25 (XS25) |
Not applicable |
R1-S22 (XS22)
(attached to DA pair 2)
|
| R3-S27 (XS27) |
Not applicable |
R1-S24 (XS24)
(attached to DA pair 0)
|
Does Rack-1 have the necessary DA cards and
storage enclosures to install Rack-3?
- Yes, continue with Inspecting for shipping damage.
- No, stop the installation. To install all storage enclosures
in Rack-3, you must install the MESs to add the necessary DA cards
or storage enclosures to Rack-1. It is possible to continue the installation
without installing the MESs but you will not be able to install all
the Rack-3 storage enclosures. Work with your customer and next level
of support to decide how to proceed. If the decision is to proceed,
continue with Inspecting for shipping damage.
- You are installing Rack-4. Observe
the rear of Rack-4 and Rack-2. Use Table 5 to determine
if Rack-2 has the specific storage enclosures necessary to connect
the cables for the Rack-4 storage enclosures.
Table 5. Determining if Rack-4 storage
enclosures can be cabled to Rack-2 storage enclosuresIf the rear of Rack-4 has a storage enclosure
with DDMs in location:
(see Figure 6) |
The rear of Rack-2 must have a storage enclosure
with DDMs in location:
(see Figure 6) |
|---|
| R4-S21 (XS21) |
R2-S22 (XS22)
(attached to DA pair 6)
|
| R4-S23 (XS23) |
R2-S24 (XS24)
(attached to DA pair 4)
|
| R4-S25 (XS25) |
R2-S26 (XS26)
(attached to DA pair 7)
|
| R4-S27 (XS27) |
R2-S28 (XS28)
(attached to DA pair 5)
|
Does Rack-2 have the necessary storage enclosures
to install Rack-4?
- Yes, continue with Inspecting for shipping damage.
- No, stop the installation. To install all storage enclosures
in Rack-4, you must install the MESs to add the necessary storage
enclosures to Rack-2. It is possible to continue the installation
without installing the MESs but you will not be able to install all
the Rack-4 storage enclosures. Work with your customer and next level
of support to decide how to proceed. If the decision is to proceed,
continue with Inspecting for shipping damage
- You are installing Rack-5. Observe
the rear of Rack-5 and Rack-3. Use Table 6 to determine
if Rack-3 has the specific storage enclosures necessary to connect
the cables for the Rack-5 storage enclosures.
Table 6. Determining if Rack-5 storage enclosures
can be cabled to Rack-3 storage enclosuresIf the rear of Rack-5 has a storage enclosure
with DDMs in location:
(see Figure 6) |
The rear of Rack-3 must have a storage enclosure
with DDMs in location:
(see Figure 6) |
|---|
| R5-S21 (XS21) |
R3-S22 (XS22)
(attached to DA pair 3)
|
| R5-S23 (XS23) |
R3-S24 (XS24)
(attached to DA pair 1)
|
Does Rack-3 have the necessary storage enclosures
to install Rack-5?
- Yes, continue with Inspecting for shipping damage.
- No, stop the installation. To install all storage enclosures
in Rack-5, you must install the MESs to add the necessary storage
enclosures to Rack-3. It is possible to continue the installation
without installing the MESs but you will not be able to install all
the Rack-5 storage enclosures. Work with your customer and next level
of support to decide how to proceed. If the decision is to proceed,
continue with Inspecting for shipping damage
Example
The following is for reference.
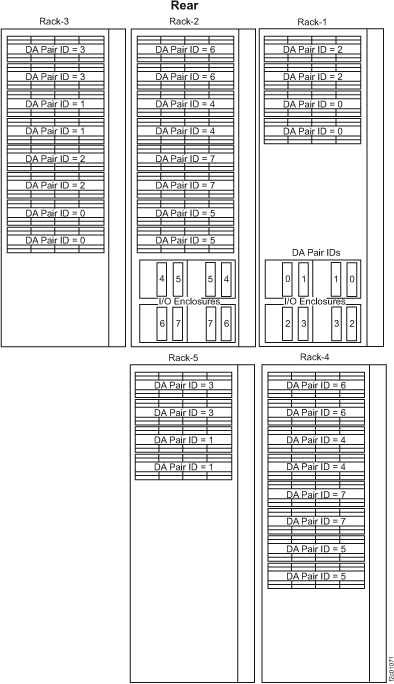
Figure 9. Device
adapter pair IDs for storage enclosures
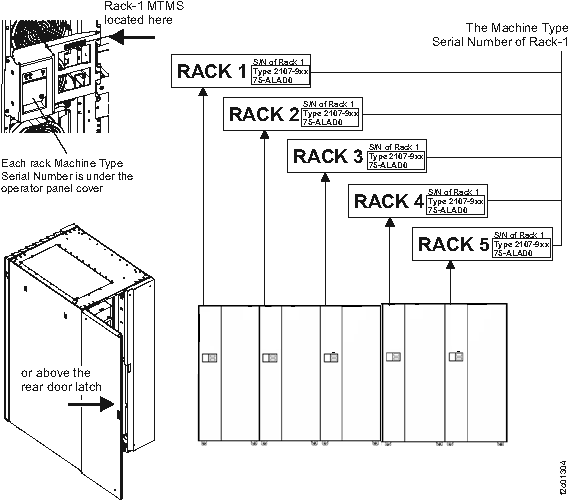
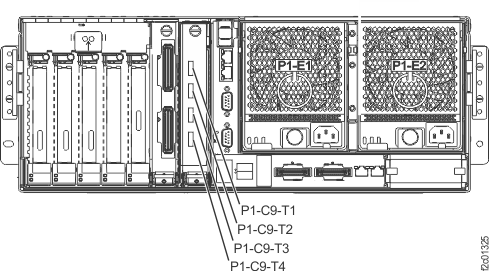
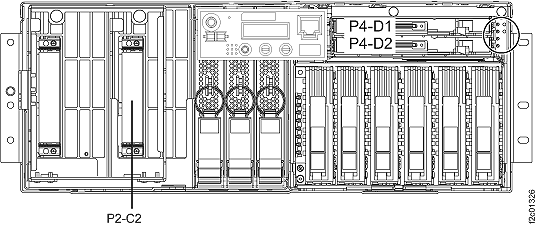
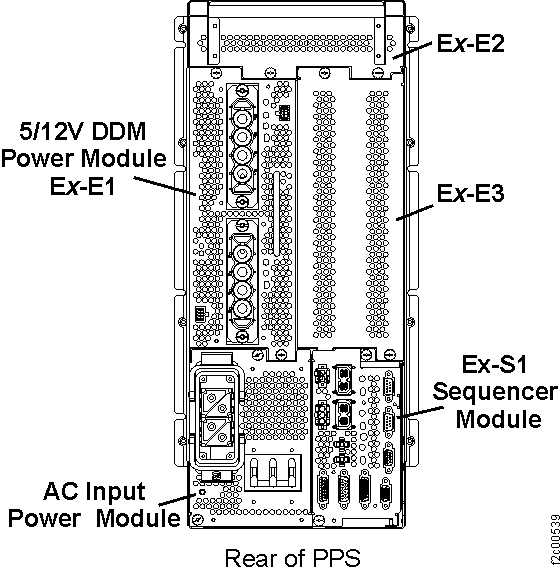
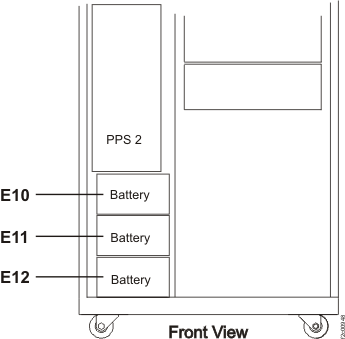
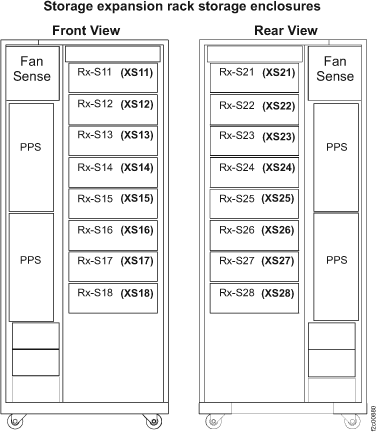
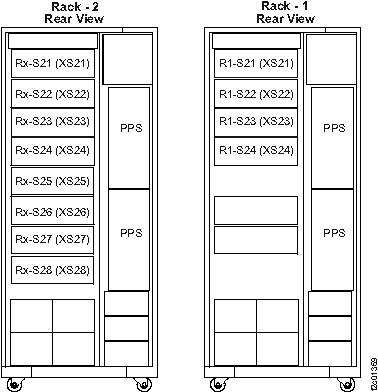 Figure 8. Locations for device adapter cards