DS8000 Service Documentation Version 7.5

Routing and connecting the Rack-2 SPCN and PCIe cables

Procedure

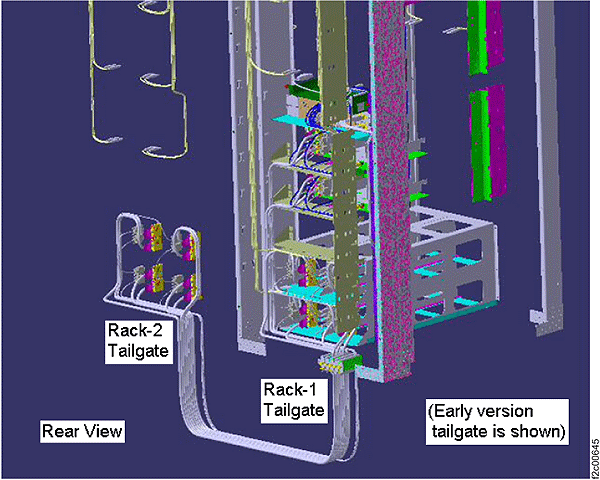
  1. This step shows an overview of the Rack-2 to Rack-1 routing of the PCIe and SPCN cables. Do not route or connect the cables until directed in later steps.
    Figure 1. Mechanical routing of the PCIe and SPCN cables (rack-to-rack)
    Mechanical routing of the RIO and SPCN cables (rack-to-rack)
    • On a raised floor, the cables are run down through the tile cutouts and underneath the floor.
    • On a non-raised floor, the cables are run beneath the racks.
  2. Do the following:
    1. At the rear of Rack-2 uncoil the thick PCIe cables that are stored above the I/O enclosures.
    2. The loose end of each PCIe cable has a label that identifies the Rack-1 CEC enclosure (XC1, XC2) it will be routed to.
    3. Use Figure 2 and Figure 3 to translate the label location code to the physical location.
      Figure 2. CEC enclosure locations on cable labels (rear view)
      CEC enclosure locations on cable labels (rear view)
      Figure 3. I/O enclosure locations on cable labels
      Model 951, I/O enclosure locations on cable labels
  3. Route the PCIe cables inside of Rack-2. See Figure 4.
    • Route the PCIe cables on the left side of the rack through slot 1.
    • Route the PCIe cables on the right side of the rack through slot 6.
    Figure 4. PCIe and SPCN cable routing through Rack-2 tailgate
    PCIe and SPCN cable routing through Rack-2 tailgate
  4. Do the following for the SPCN cables:
    1. At the rear of Rack-2 uncoil the thin SPCN cables that are stored above the I/O enclosures.
    2. The loose end of each SPCN cable has a label that identifies the Rack-1 CEC enclosure (XC1, XC2) or I/O enclosure (XI1, XI2, XI3 or XI4) it will be routed to.
    3. Use Figure 2 and Figure 3 to translate the label location code to a physical location.
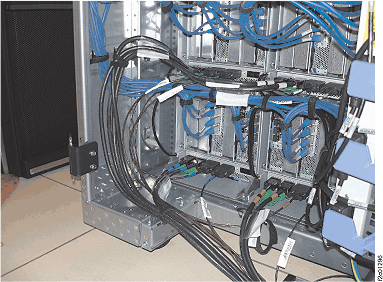
  5. Route the SPCN cables.
    • For cable routing inside of the rack, see Figure 5.
    • Route the SPCN cables on the left side of the rack through slot 2.
    • Route the SPCN cables on the right side of the rack through slot 5.
    Figure 5. PCIe and SPCN cable routing through the Rack-1 tailgate
    PCIe and SPCN cable routing through the Rack-1 tailgate
  6. Plug the SPCN cables into the indicated connector on the destination CEC and I/O enclosures. Figure 2 and Figure 3 displays the connector locations.
  7. Plug the PCIe cables into the indicated connector on the destination CEC enclosure. Figure 2 displays the connector locations.
    Note: The four PCIe connectors on the P1-C9 card that the expansion rack PCIe cables connect to are turned 180 degrees from the connectors on the P1-C1, C2, C3 and C5 cards that the Rack-1 PCIe cables connect to.
  8. Reinstall the tailgate cable retention clamps to secure the PCIe and SPCN cables in the tailgate.
  9. Do you have additional expansion racks to install on this storage facility?