Before you begin
Repeat the following steps for each rack that you are installing.
Attention: YOU MUST USE ONLY MODEL
961, 96E MAINLINE POWER CABLES.
Prior model mainline power cables can damage the 961, 96E DC-UPS even though the cables may look identical.
Prior model mainline power cables can damage the 961, 96E DC-UPS even though the cables may look identical.
Procedure
- The mainline power cable that connects
to the upper DC-UPS (Un-E1)
 is longer than the mainline power
cable that connects to the lower DC-UPS (Un-E2)
is longer than the mainline power
cable that connects to the lower DC-UPS (Un-E2)  . See Figure 1.
Use the cable label and part number (P/N) to identify the longer cable.
. See Figure 1.
Use the cable label and part number (P/N) to identify the longer cable. Table 1. Cable label and part number for standard bottom exit feature Feature Code P/N of shorter cable
(Lower DC-UPS)P/N of longer cable
(Upper DC-UPS)1080 - Three-phase high voltage (five-wire 3P+N+G), 380 - 415 V, 30A, IEC 60309 5-pin customer connector 98Y4283 98Y4284 1081 - Three-phase high voltage (five-wire 3P+N+G), 380 - 415 V, 32A, no customer connector provided 98Y3729 98Y3730 1082 - Three-phase low voltage (four-wire 3P+G), 200 - 240 V, 60A, IEC 60309 4-pin customer connector 98Y3725 98Y3726 1061 - Single-phase (three wire 2P+G), 200-240V, 60A, IEC 60309 3-pin customer connector 98Y3733 98Y3734 1068 - Single-phase (three wire P+N+G), 200-240V, 63A, no customer connector provided 98Y3737 98Y3738 Figure 1. Mainline power cables (Model 96x)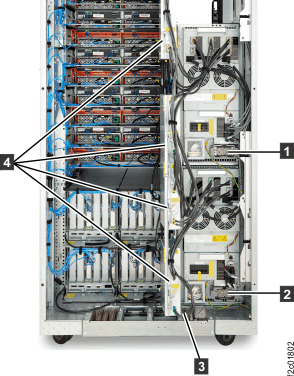
- Ensure the PDUs
 are in the open position. See Figure 1.
 - If you are installing Rack-3 or Rack-4,
at the rear of the rack remove the tailgate plate. See Figure 2.
- Remove two left screws .
- Loosen but do not remove two rear screws .
- Remove tailgate plate
 .
.
Figure 2. Rack-3 or Rack-4 tailgate plate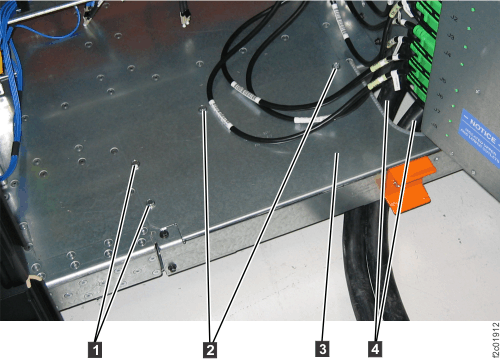
- Remove two left screws
- Route and connect the mainline power cables to
the DC-UPS in the racks being installed. See Figure 1.
- Route the longer mainline power cable up through the
tailgate and connect it to the upper DC-UPS . Ensure it stays fully to the left
to not block access to the lower DC-UPS.
- Route the shorter mainline power cable up through the
tailgate and connect it to the lower DC-UPS .
Notes:- If this is on a raised floor, route the cables down through the floor cutout and near the customer power connectors.
- If this is not on a raised floor, route the cables underneath the frame behind the rear caster so they exit to the side. The cables must not exit the rack in the front or rear service areas.
- Route the longer mainline power cable up through the
tailgate and connect it to the upper DC-UPS
- For the
top exit line cord features, the mainline power cable that connects
to the lower DC-UPS is longer than the mainline power
cable that connects to DC-UPS (upper) . See Figure 1.
Use the cable label and part number (P/N) to identify the longer cable.
Table 2. Cable label and part number (top exit line cord) Feature Code P/N of shorter cable
(Upper DC-UPS)P/N of longer cable
(Lower DC-UPS)1083 - Three-phase high voltage (five-wire 3P+N+G), 380 - 415 V, 32A, no customer connector provided 98Y3732 98Y3731 1084 - Three-phase low voltage (four-wire 3P+G), 200 - 240 V, 60A, IEC 60309 4-pin customer connector 98Y3728 98Y3727 1085 - Three-phase high voltage (five-wire 3P+N+G), 380 - 415 V, 30A, IEC 60309 5-pin customer connector 98Y4286 98Y4285 1072 - Single-phase (three wire 2P+G), 200-240V, 60A, IEC 60309 3-pin customer connector 98Y3736 98Y3735 1073 - Single-phase (three wire P+N+G), 200-240V, 63A, no customer connector provided 98Y3740 98Y3739 - Ensure the PDUs are in the open position. See Figure 1.
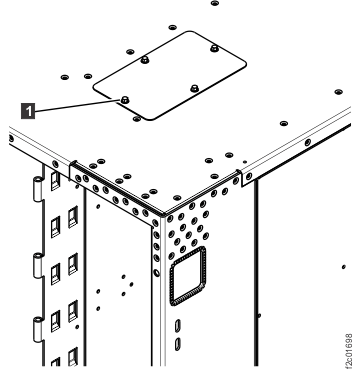
- Remove the top exit cover plate.
- Reinstall the screw nearest the rear of the rack. See Figure 3.
Save the remaining screws to install the clamp housing.
- Store the cover plate in the document enclosure at the
upper front left of the rack. Figure 3. Removing top exit line cord cover plate
- Reinstall the screw
- Route and connect
the mainline power cables to the DC-UPS in the racks being installed.
See Figure 4.
- Route the longer mainline power cable down
through the opening and connect it to the lower DC-UPS . Ensure the routing stays fully to
the left to allow service access to the upper DC-UPS.
- Route the shorter mainline power cable down through
the top opening and connect it to the upper DC-UPS .
- The upper DC-UPS main line power cable must be routed to the right of the
lower DC-UPS main line power cable . Note: This ensures there is enough room for the PDUs to close fully.
- Pull both main line power cables
 down an extra 15 cm (5 inches). This
will create extra slack (S-curve) so that the cables can be moved
as needed for service access to FRUs. Figure 4. Model 961, 96E top exit main line power cables to DC-UPS
down an extra 15 cm (5 inches). This
will create extra slack (S-curve) so that the cables can be moved
as needed for service access to FRUs. Figure 4. Model 961, 96E top exit main line power cables to DC-UPS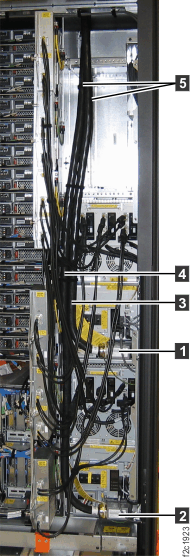
- Route the longer mainline power cable down
through the opening and connect it to the lower DC-UPS
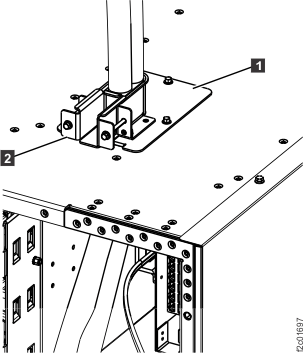
- Install the top exit mainline cable clamp housing.
- Remove the adjustable clamp bracket from the top exit line mainline cable
housing .
- Install the adjustable clamp bracket into the housing.
Tighten it enough to prevent the cables from slipping, but do not
over tighten. See Figure 5. Figure 5. Top exit line cord clamp
- Remove the adjustable clamp bracket