DS8000 Service Documentation Version 7.5

MAP6590 Modem problem

Use this procedure to resolve problems with the management console connection.

MAP6590 Section-1

Procedure

  1. Verify that the modem and phone line are functioning properly by performing the following steps.
    1. From the navigation area, click Service Management.
    2. In the right work area, go to the Connectivity section and click Manage Outbound Connectivity.
    3. The Call Home Server Consoles window opens, click Configure.
    4. Select the Local Modem tab.
    5. Select the first listed phone number and click Test.
    6. Click Start to start the test.
    7. Monitor the Test Status to verify that the call is completed successfully.

      Did the call complete successfully?

      • Yes, the modem is functioning properly. The problem is not in the modem. This ends the procedure.
      • No, go to step 2.
  2. From the Manage Outbound Connectivity selection, review the configuration settings for the modem. Are the settings correct?
    • Yes, go to step 4.
    • No, to go step 3.
  3. Correct the management console configuration settings. Return to step 1.
  4. Find the management console that you have.

MAP6590 Section-2, xSeries 335, 336, or 3550

Procedure

  1. Perform the following checks:
    1. On the modem card at the rear of the management console server, verify that the customer analog telephone line is connected to the modem connector (RJ-11 phone line). See Figure 1 (x335 server) or Figure 2 (x336 server) or Figure 3 (x3550 server).
    2. Trace the telephone cable back to the customer's telephone line connector and ensure that it is connected.
    3. Work with the customer to verify that the telephone line is working correctly and is analog, not digital.
    4. Ensure that the phone line is dedicated to this management console and is not shared.
    Figure 1. The modem connector (RJ-11 phone line) on the rear of the X335 management console server
    Modem connector on the X335 management console server
    Figure 2. The modem connector (RJ-11 phone line) on the rear of the X336 management console server
    Modem connector on the X336 management console server
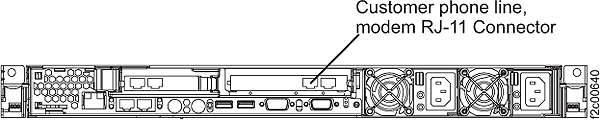
    Figure 3. X3550 management console server RJ-11 connector
    X3550 management console server RJ-11 connector
  2. Did you find a problem with the telephone line or connections?
    • Yes, correct the telephone line or connection problem. After that is corrected, return to MAP6590 Section-1, step 1 to test the modem connection.
    • No, go to MAP6590 Section-4.

MAP6590 Section-3, ThinkPad laptop

Procedure

  1. Ensure that the customer telephone line cable is connected to the USB modem RJ-11 connector at the rear of the rack behind the laptop tray. See Figure 4 and Figure 5.
    Figure 4. ThinkPad laptop customer modem and Ethernet connectors, rear of rack
    Laptop rear connector view
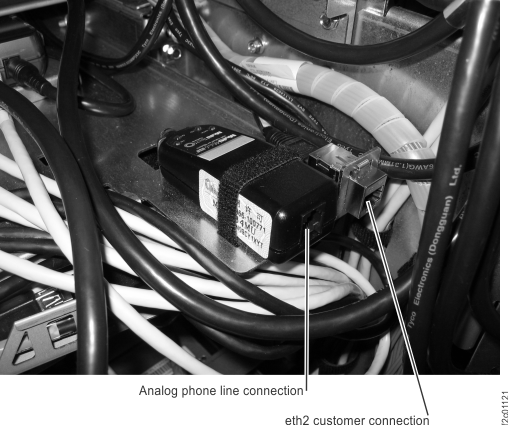
    Note: Ethernet connector and modem connector may be reversed on some racks. Both connectors are located at the rear of the rack, to the right of the Ethernet switches, below the bottom storage enclosure air baffle.
    Figure 5. Customer modem and Ethernet connectors, DS8870 All Flash, rear of rack
    Ethernet switch tray locations (Model 961 rack version 2 rear)
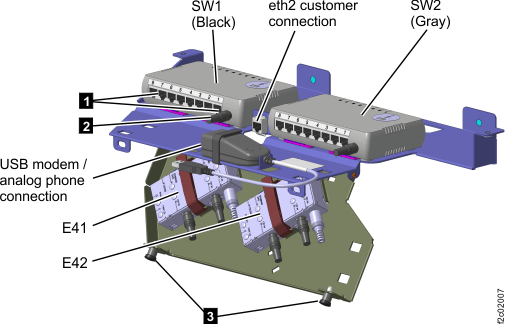
  2. Ensure that the USB modem is properly connected to the laptop USB port. The USB modem is located at the rear of the rack and connects to the laptop with a USB extension cable. See Figure 6 and Figure 7. For T540, see Figure 6 and Callout label 6 Figure 8.
    Figure 6. External modem for laptop W500
    External modem for laptop W500
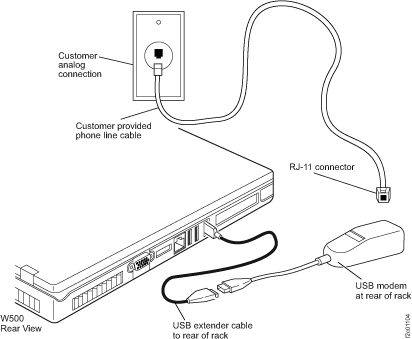
    Figure 7. ThinkPad T510, T520, or T530 laptop unit network and modem ports
    ThinkPad T510 laptop unit network and modem ports
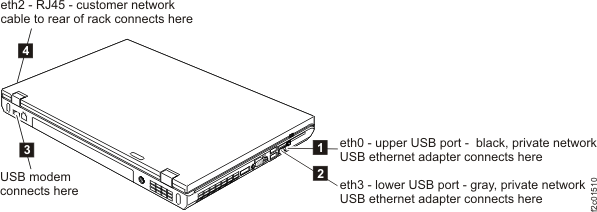
    Figure 8. ThinkPad T540 laptop unit cable connections (right)
    ThinkPad T540 laptop unit cable connections (right)
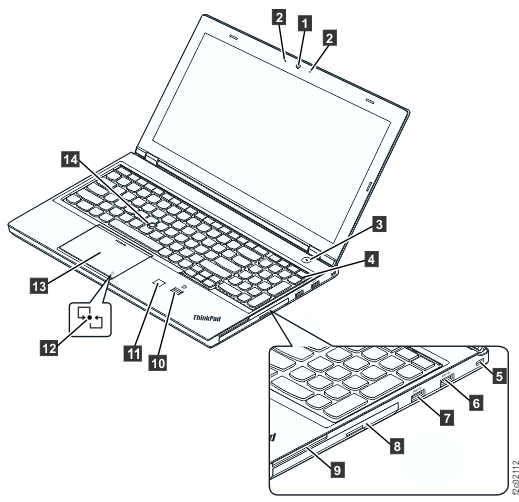
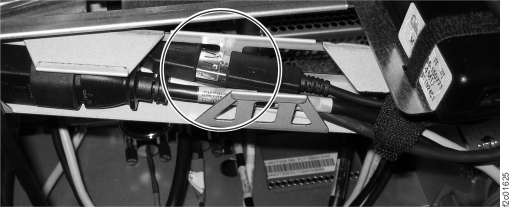
  3. Ensure that the USB modem pigtail cable is connected to the USB extender cable in the laptop tray cable management folding arm at the rear of the rack, as shown in Figure 9.
    Figure 9. USB modem extender cable connection
    USB modem extender cable connection
  4. Ensure that the modem is ready. One or more LED indicators should be lit.
  5. Ensure that the telephone line is working.
    1. Work with the customer to ensure that their telephone line is not damaged and is connected to their analog (not digital) telephone line connector.
    2. The customer can test their connector to ensure that a dial tone is present.
  6. Did you find a problem with the telephone line or connections?
    • Yes, correct the telephone line or connection problem. After that is corrected, return to MAP6590 Section-1, step 1 to test the modem connection.
    • No, replace one or more of the FRUs shown in Figure 6 until the problem is corrected. Then, return to MAP6590 Section-1, step 1 to test the modem connection.

What to do next

This ends Section-3.

MAP6590 Section-4

You are here to replace a modem card in a management console server (not laptop). In this section, you power off the management console to replace the modem card.

Procedure

  1. Ensure that the customer is not currently accessing the management console, such as to perform logical configuration functions or copy service functions.
  2. Replace the modem card in location P1-C1 on the rear of the management console server.
    1. In the following steps, refer to the appropriate maintenance manual for the management console server. The manual is on the IBM® DS8000® series Service Documents CDROM:
      • xSeries 335 Type 8676, Type 8830 Hardware Maintenance Manual and Troubleshooting Guide
      • xSeries 336 Type 1879 and Type 8837 Hardware Maintenance Manual and Troubleshooting Guide
      • IBM System x3550 Type 7978 and 1913 Problem Determination and Service Guide
    2. Power off the server. (Refer to the "General Information " section).
    3. Replace the modem. (Refer to the "Customer replaceable units" section).
    4. Power on the server. (Refer to the "General Information " section).
  3. Return to MAP6590 Section-1, step 1 to verify the modem connection.
  4. Is the problem resolved?
    • Yes, this ends the procedure.
    • No, contact your next level of support.