About this task
DANGER
The DS8000® will
be powered on automatically during this procedure. Hazardous voltages
are present. Ensure that all safety covers are in place and that normal
safety precautions are taken.
Procedure
- Record the date and time as follows:
- Record the stop date and time for the HMC Initial Configuration phase in Table 3, in section Recording information for the installation report.
- Record the start date and time for the Storage Facility Bring-up phase in Table 3, in section Recording information for the installation report.
- On Rack-1 set the Local/Remote switch 1 on
the LR/ZLR card to Remote (up
 position). Figure 1. Local/Remote switch
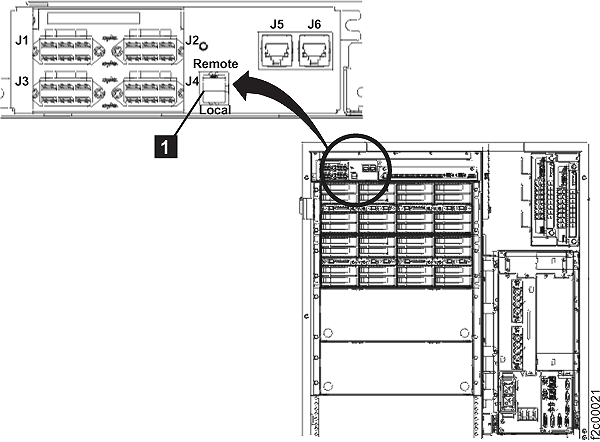
- If you are installing a new storage facility
to an existing storage complex, then ensure that the Ethernet cables
have been installed and connected between the new storage facility
and the existing storage facility that contains primary management
console (MC 1). Record the time that this connection was made. The "Discover
Storage Facility" process cannot be run until at least 15 minutes
have elapsed after making this connection. Note: If the new storage facility contains a secondary management console, leave the new secondary management console Ethernet cables disconnected at the Ethernet switches. They will be connected later.
- Has it been
30 minutes since you completed the Rack-1 UEPO switch testing?
- Yes, go to step 5.
- No, when you know 30 minutes have elapsed since the Rack-1 UEPO switch testing, go to step 5.
Note: At these code levels, there is a known condition where the service processor card in each CEC enclosure (after a UEPO switch power off) has a stale TCP/IP address. The HMC will not be able to successfully continue with the installation process. At 15-minute intervals, the service processor cards check the HMC DHCP server and receives new TCP/IP addresses to replace the stale addresses. After the new addresses are received, the HMC will be able to successfully continue with the installation process. Waiting 30 minutes allows several minutes for the service processor cards to power on, self-test, and then attempt to check their TCP/IP addresses with the HMC DHCP server.The service processor cards are ready much faster than the HMC can boot up. Consequently, the first time they check the HMC DHCP server the server is not yet ready. After 15 minutes have elapsed, the service processor cards check again and this time the HMC DHCP server is ready and can assign new addresses. This problem has been fixed in later code levels.
- Power on and verification of the new storage
facility must be performed from the primary management console (MC 1). If not
done previously, slide the MC 1 management
console keyboard/display
drawer out to the service position and raise the panel display. If
not done previously, log on to the management console. The CE user
ID and password are as follows:
ID: CE
Password: serv1ceceNote: If the management console panel is not functioning correctly, go to MAP6020 Management console problem determination. - Once the installation process is started with the HMC GUI, do not interrupt the process by rebooting or shutting down the system or the HMC in any way. Doing so will cause an extended recovery process. Instead, contact your next level of support if you encounter any problems during the installation process that are not repaired by using the guided repair procedures.
- Are you adding a new storage facility to an existing storage complex?
- You are installing
a new storage facility to an existing storage complex. Has it been
15 minutes since the Ethernet cables were connected between the new
storage facility and the existing storage facility that contains primary
management console (MC 1) ?
- Yes, go to the next step.
- No, wait until 15 minutes have passed and then go to the next step.
Note: If 15 minutes have not elapsed, the next step may hang. - Run the Discover Storage Facility task.
- From the navigation area, click Storage Facility Management.
- From the bottom Tasks area, click Discover Storage Facility. You can click this option only once.
- Wait for the Machine Type, Model, and Serial number of the storage facility to be installed, to display at the top of the screen, with an installation state of "Ready for Field Install" or "New".
Note: Depending on system state, this task might take less than one minute or as long as 20 minutes to complete. - Was the Discover Storage Facility task
successful?
- Yes, go to the next step.
- No, wait 15 more minutes and then retry the Discover Storage Facility task. If it is successful, go to the next step. If it fails again contact your next level of support.
- Display the storage facility install
state.
- From the navigation area, click Storage Facility Management.
- In the right work area, the Install State column displays the installation state of the storage facility.
- Is the Machine Type and Serial Number for the storage facility being
installed listed on the panel as "Ready for Field Install" or "New"?
- Yes, select the storage facility to be installed. Go to the next step.
- No, if the discover process was successful, and the MTMS is not displayed, go to step 1 of MAP1400 HMC is reporting an installation error before serviceable events being created. If you did not run the Discover Storage Facility task, return to step 9.
- In the bottom Tasks area,
expand Storage Facility Install/Remove.
- If the Install State is New, click Install New Storage Facility to start the installation.
- If the Install State is Ready for Field Install, click Storage Facility Field Install to start the installation.
Note: After clicking Install New Storage Facility, depending on system state, it may take less than one minute or as long as 20 minutes for the next dialog box to display. This is normal. Do not click Install New Storage Facility again. - Follow the HMC prompts to perform the following tasks:
- The option to run the certify DDM process
must be selected for all installations. The certify process will automatically
start after the Storage Facility Field Install software process is
completed (that is after you have completed step A3 in Table 1). Note: Record the start date and time for the Monitor Certify DDM phase in Table 4, in section Recording information for the installation report.
- When the certify DDM process is complete the
customer must be notified the storage facility is ready for use. There
are two options:
- If you will leave the customer site before the certify DDM process completes, select the option to generate a call home.
- If you will stay onsite until the certify DDM is complete and you will notify the customer, then the call home is not required.
- If prompted, install the storage facility
configuration CD into the HMC CD/DVD-RAM drive. The CD/DVD is included
in the ship group. Note: The CD should be in the CE envelope. If it is not in the envelope, check the customer envelope and the shipping material for the rack.
- The option to run the certify DDM process
must be selected for all installations. The certify process will automatically
start after the Storage Facility Field Install software process is
completed (that is after you have completed step A3 in Table 1).
- The next HMC message will indicate that the Storage
Facility Field Install process will now start.
- This message refers to the software installation process. This action can take up to 1.5 hours to complete.
- The software installation is not finished until you have completed step A3 in Table 1.
- There are additional install steps required after the software installation process is complete.
- Click OK.
Note: If errors occur during the automated installation process, on-screen messages will direct you to "MAP1400 Repair a problem found during install storage facility process". Use the guidance in that MAP to resolve the problem and then restart the installation process. - To minimize the installation
time, activities from Table 1 can
be performed in parallel with activities from Table 2.
- Use Table 1 to
monitor and respond to the progress of the installation screens.Note: The installation status screens will update at the bottom, so you may need to scroll down to see the latest status.
- Use Table 2 to continue the remaining installation tasks.
Table 1. Monitor the progress of the installation screens Installation Process A A1 Do not log off or restart the management console. A2 Check the HMC every 10 minutes and respond to any pop-up messages from the installation process. If an error is detected, follow the on-screen directions to go to MAP1400 HMC is reporting an installation error before serviceable events being created to repair the problem and restart. A3 A message will display that indicates Field Installation Verification for the Storage Facility has completed. You may be asked to check if any problems were logged. Read the on-screen instructions carefully, keep the message box open and do not reply to the message until after you have checked for problems. A4 If the new storage facility is Machine Type 2421, 2422, 2423, or 2424 (not 2107) as shown on the Rack MTMS (Machine Type, Model, Serial) label, do the following: - Expand Storage Facility Management in the left Navigation area.
- Check the displayed MTMS of the new storage facility (e.g. 2421-931*75ABCD0).
- Is the displayed Machine Type 2107?
- Yes, select the MTMS of the new storage facility, go to the bottom Tasks area, and click Refresh Storage Facility States. It should now appear as a Machine Type of 242x. Continue with step A5.
- No, it is 242x, continue with step A5.
A5 A message will display that indicates Certify DDM has started. Continue with Table 2 Note: Do not proceed with section "Finish the installation and cleanup" until the items in Table 1 above are complete.Table 2. Continue the remaining installation tasks Installation Process B B1 Do the following: - You are installing a storage facility that contains an integrated management console, then continue with Completing the management console customization and configuration.
- Use Table 1 to
monitor and respond to the progress of the installation screens.