MAP4020 Hard disk drive build process for both boot drives in a storage facility image LPAR
This procedure loads AIX and 2107 functional code on both the hard disk drives of one storage facility (SFI) image LPAR.
About this task
MAP4020 Section-1
Procedure
- Were you sent here from another MAP to do the hard disk
drive build process for both boot drives?
- Yes, go to the next step.
- No, return to the procedure that sent you here.
Replacing a single hard disk drive can be done concurrently with customer operation on the partition. The repair process will automatically mirror the data to the new drive.
MAP4020 is not used if only one hard disk drive is being replaced.
Notes:- A typical hard drive rebuild process may take 40 - 45 minutes to complete. Time can vary depending on the contents of the LIC bundle level.
- The LPAR resume process at the end takes additional time, approximately 15 minutes. If the 2107 LIC code bundle required by the hard drive rebuild process does not exist on the HMC and needs to be acquired, that will take additional time.
- MAP4020 in this service information
center is used for 242x (2421, 2422, 2423, or 2424) Model 941 and Model 951 machines
on AIX 6.1.x. Observe the machine model. Which machine type-models
are you installing?
- Machine type-models: 242x-941 or 242x-951, continue to the next step.
- Any other models: STOP, and go to the correct service information center release links.
- Display and write down the LIC bundle running on this storage facility. This will be the level
to be installed on the LPAR. Complete the following steps on the HMC:
- From the navigation area, click Updates.
- From the right work area, select the radio button for the appropriate storage facility. The bottom Task area displays a list of tasks you can select.
- Select Display Storage Facility Code Levels.
- Find Package: HMC, MTMS: XXXXXXX*XXXXXXX and find the Bundle VRMF: xx.xx.xx.xx beneath it. There may be more than one bundle under install history; select the top line, which is the latest bundle.
- Find Package: SEA.sfi , MTMS: xxxx-xxx*xxxxxxx-Vx and find the Date: yyyy/mm/dd-hh:mm, Bundle VRMF: xx.xx.xx.xx beneath it. There might be more than one bundle; you are looking for the bundle associated with the latest date and the MTMS of the affected CEC. This should match the HMC level from step d.
- Write down the LIC bundle VRMF. Note: If the levels do not match, contact the next level of support to confirm which level you should be installing.
- Ensure that the 2107 LIC bundle for code
level to be installed to the LPAR has been acquired to the HMC before
starting the LPAR hard drive rebuild.
- From the navigation area, click Updates.
- From the right work area, select the radio button for the appropriate HMC. The bottom Task area displays a list of tasks you can select.
- Click "+" to expand the HMC Library Utilities section.
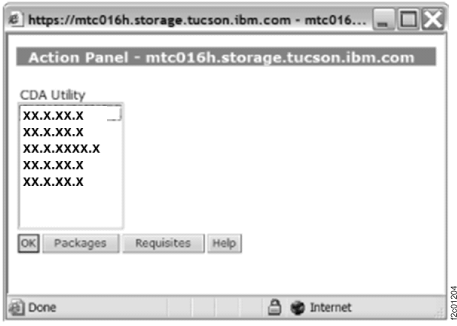
- Select Display Library Contents,.
A new window similar to Figure 1 displays.
The window takes a few seconds to display the library contents. Figure 1. Window: Library contents

- You are looking for a bundle level matching the bundle VRMF you identified in step 3.
- Has the correct LIC bundle been acquired to the HMC?
- Yes, go to the next step.
- No, acquire the correct level of 2107 LIC bundle to the HMC. See MAP4025 Acquire 2107 LIC bundle to the HMC.
- Ensure that the special hard drive rebuild AIX BASE mksysb bundle
has been acquired to the HMC before starting this procedure.
- The special hard drive rebuild bundle supplies the mksysb image for AIX-BASE and AIX-TL that will be used during the LPAR rebuild.
- The special bundle VRMF is in format vv.r.61xy.0, where 61xy indicates AIX 6.1 with TL level x.
- To determine the correct special bundle VRMF that matches the 2107 LIC bundle code level, go to MAP4020 Section-3 (How to determine the correct level of special hard drive rebuild bundle before acquire to the HMC), and then return here to continue.
- From the navigation area, click Updates.
- From the right work area, select the radio button for the appropriate HMC. The bottom Task area displays a list of tasks you can select.
- Click "+" to expand the HMC Library Utilities section.
- Select Display Library Contents. A new window similar to Figure 1 is displayed. The window takes a few seconds to display the library contents.
- You are looking for a bundle level matching the special hard drive rebuild bundle (SFIGHDR_MKSYSB_VERSION) identified in step 5.c.
- Has the correct special hard drive rebuild bundle been
acquired to the HMC?
- Yes, go to the next step.
- No, acquire the correct special hard drive rebuild bundle to the HMC. See MAP4025 Acquire 2107 LIC bundle to the HMC.
- Ensure that the HMC routing
table is set correctly before starting this procedure.
- From the navigation area, click HMC Management.
- From the right work area, under HMC Management, click Change Network Settings.
- A window pops up for Customize Network Settings; select the tab for Routing.
- If the Enable 'routed' check box is present, ensure that it is not selected. Leave all other settings unchanged and click the OK button.
- Wait for the message box to display Network Settings
Updated, and go to the next steps. Note: This change does NOT require HMC reboot to take effect.
MAP4020 Section-2
Procedure
- Ensure that you can identify the failing SFI partition
name and the CEC enclosure on which it runs.
Example of a CEC enclosure: 9117-570*13AADF0
Example of SFI partition: SF1303240ESS11
- From the navigation area, click Storage Facility Management > 242x-9x1*sssssss > Server View > Server-9117-xxx-SNsssssss
- Observe the Active Profile column contents.
- Ensure that you have acquired both 2107 LIC bundle and the special hard drive rebuild AIX BASE mksysb bundle if they are not already on the HMC.
- Select the SFI LPAR on which you want to complete the hard disk drive build process.
- From the navigation area, click Storage Facility Management > storage facility > SF image.
- From the right work area, select the failing LPAR (partition).
- From the bottom Task area, click Service Utilities > Rebuild CEC Hard Drive.
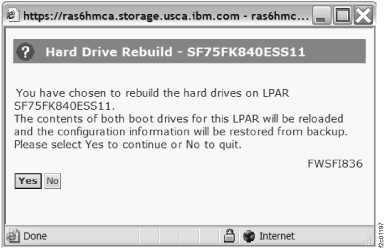
- You will see a window that displays a series of progress
messages related to checking peer LPAR states. When the check is complete,
a window similar to Figure 2 displays
for you to confirm your choice of LPAR to rebuild. Figure 2. Window: Hard Drive Rebuild

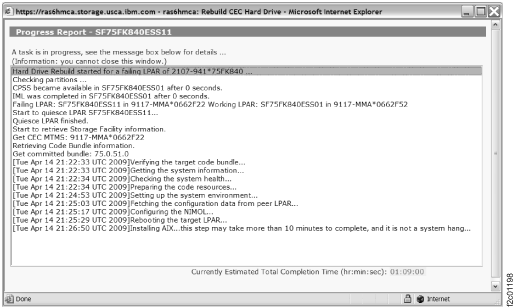
- After confirmation, the LPAR hard drive rebuild process
takes place on the targeted LPAR and progress will be displayed in
a window similar to Figure 3. Figure 3. Window: Hard drive rebuild progress

- A window similar to Figure 4 continues to illustrate
expected progress during the LPAR hard drive rebuild process. Some steps might require more time
than others.
At the end of the LPAR hard drive rebuild process, the rebuilt LPAR will reboot automatically and IML for the first time. It might discover additional open serviceable events that could occur on this LPAR. This IML process could take up to 10 minutes.
Figure 4. Window: Hard drive rebuild continued progress
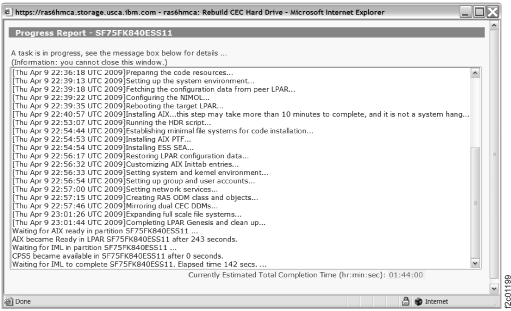
- When the first IML process completes, the progress window
automatically closes and a new window, similar to Figure 5 displays.
If no new serviceable events are opened for this LPAR, click Yes to move on to resume process in the next step.
If new events were opened, repair the problems accordingly. When all new serviceable events related to this LPAR are closed, return to the window below and click Yes to move on to the RESUME process.
Figure 5. Window: Hard drive rebuild resume confirmation
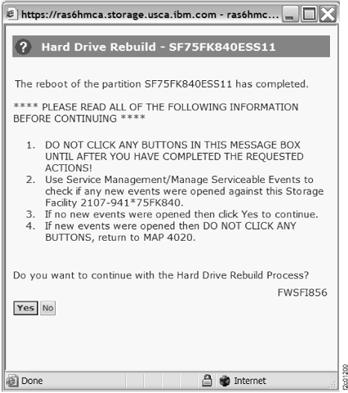
- When all new serviceable events related to this LPAR are closed in the previous step,
click Yes to resume this LPAR. See Figure 6.
The resume process might take up to 15 minutes, depending on the storage facility configuration.
Figure 6. Window: Hard drive rebuild resume LPAR confirmation
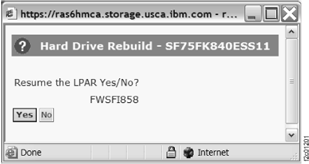
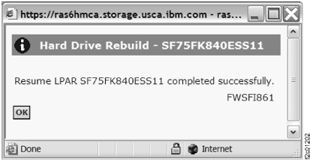
- When rebuilt the LPAR is resumed successfully, you will
see a window similar to Figure 7 display.
Click OK. Figure 7. Window: Hard drive rebuild resume LPAR completion
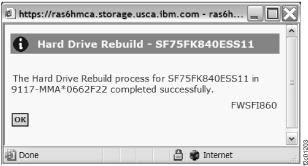
- Figure 8 shows an
example of the completion of the LPAR hard drive rebuild service action.
Exit this MAP and return to the procedure that sent you here. Figure 8. Window: Hard drive rebuild completion

- Check for missing install corrective service (ICS) and reinstall ICS.
- For LIC bundle levels that contain the menu item "Verify Bundle Installed":
- From the navigation area, click Updates > storage facility > Verify Bundle Installed > code level
- In the ICS Images section, find the list of ICS images that need to be reinstalled, find the ICS media, and reinstall them.
- For LIC bundle levels that do not contain the menu item "Verify Bundle Installed":
- From the navigation area, click Updates > storage facility > Display Storage Facility Code Levels >
- Look for the "CDA Install History" section at the bottom of the display.
If further assistance is needed, contact your next level of support.
- For LIC bundle levels that contain the menu item "Verify Bundle Installed":
MAP4020 Section-3 (How to determine the correct level of special hard drive rebuild bundle before acquire to the HMC)
Procedure
- From the navigation area, click Updates.
- From the right work area, select the radio button for the appropriate HMC. The bottom Task area displays a list of tasks you can select.
- Click "+" to expand the HMC Library Utilities section.
- Select Display Library Contents.
A new window similar to Figure 9 displays.
The window takes a few seconds to display the library contents. Figure 9. Window: Library contents

- Select the 2107 LIC bundle VRMF you found or acquired earlier in section 1,
step 4. Then, click the Requisites button. A window similar
to Figure 10 displays. Figure 10. Window: Action panel

- Look for SFIGHDR_MKSYSB_VERSION among
the list of code versions.
- This is the correct code version for the special hard drive rebuild AIX-BASE mksysb bundle.
- This special bundle must match the 2107 code bundle you want to install during the LPAR hard drive rebuild process.
- This special bundle can be acquired using the same procedure for acquiring 2107 LIC bundle. See MAP4025 Acquire 2107 LIC bundle to the HMC .
- After you have recorded the SFIGHDR_MKSYSB_VERSION, click OK. When the previous Display Library Contents window displays, click OK.
- Return to MAP4020 Section-1, step 5.c.